
FRISE - the FRee Interactive Story Engine
Writing Games with FRISE
This page describes how to write interactive fiction with the FRISE system. We begin with a very brief discussion of what is interactive fiction and what are the different ways one could organize an interactive story. Then we go over the key coding components of FRISE and how they are useful in creating interactive stories.
- Interactive Fiction and Types of Interaction
- FRISE and Story Engines
- A First Interactive Story in FRISE
- Game URLs - Links and Buttons
- Actions and Default Actions
- Presentations with Conditions
- Moving Objects and Non-Player Characters
- Presentations with Form Elements
- Navigation Bars
- Making a Save Screen
- Making an Inventory System
- Writing a FRISE story in a Language Other Than English
- Useful Abbreviations and Fields
- Text Effects Built-in to FRISE
- Doll and DollHouse Objects
- 2D Choice-Based RPGs in FRISE
- Splitting up Larger Games Across Files
- Slideshows Using FRISE
- Coding Strategies and Debugging Hints
Interactive Fiction and Types of Interaction
Interactive fiction is a kind of narrative in which different discrete scenes are presented in response to user choices. Here a scene is usually a small collection of fixed static images, video clips, or mini games, together with a text passage. If compared to a novel, scenes in scale are something between a paragraph and a chapter. Most works of interactive fiction have at most a few hundred scenes. User choices determine the navigation between scenes, and such navigation is usually accomplished by following one of a fixed number of outgoing links or instructions that take one to a different scene. From an author's perspective, a scene is a description of some location or event which is either memorable, or from which an important or memorable choice could be made. For fiction to be interactive, there has to be a choice: If the link between scenes is always "turn the page", then the narrative wouldn't be considered interactive fiction.
Interactive fiction can be broadly classified by whether user choices affect how a given scene is presented. We next consider two common cases and distinguish some interesting sub-cases. We conclude with a discussion of graphics in interactive fiction.
Choose Your Own Adventure
A Choose Your Own Adventure (CYOA) is a story that has a fixed starting scene and in which all the scenes are static (don't change based on the user's choices). Further, each scene has a fixed number of choices for which scene to go to next. To play a CYOA, the user begins from a starting scene, and moves from scene to scene by requesting/following one of the fixed choices that the current scene has. Typically, some scenes have no outgoing choices, and can be viewed as an ending of the story. CYOAs get their name from the popular Choose Your Own Adventure book series that first appeared in 1970s. In these books, the notion of link was achieved by sentences like, "If you want to help the wayward elf, go to page 76."
Even though the interactions in a CYOA are simple, one can often find in them some interesting structures. For example, when writing a CYOA, as describing a scene takes time and energy, often two scenes might share some of their outgoing choices. I.e., both Scene A and Scene B might have as one of their outgoing choices a common Scene C. Another interesting structure is that of a loop or cycle, a sequence of scenes beginning with Scene A and leading back to Scene A. As the original CYOA book series was often read from a parent to their child before bed, the parent eagerly anticipating their free time after the story was done, loops were dreaded and much feared -- they could potentially, indefinitely postpone freedom. CYOAs with no shared outgoing scenes and no loops are called tree-like, those with no loops are called DAGs (short for directed, acyclic graphs). The collection of the scenes in a story and the links between them, is called the stories graph. The Standard Patterns in Choice-Based Games page at the Interactive Fiction Wiki describes some popular choices of story graphs.
Choose Your Scenery Adventure
In a Choose Your Scenery Adventure (CYSA) story, the way a scene is presented is affected by the actions you have previously taken in the story. Typically, this involves passages or links in a scene that may be displayed or not based on your previous actions. A common use case is a scene, or a link from a scene, that tracks if you've visited it on not. So the first time you go to a room, you might see a detailed description of the room, but if you loop back, and visit it a second time, a shorter description is displayed. Another example is you are in scene with a character Bob. The links out are:
- Ask Bob about A?
- Ask Bob about B?
- Ask Bob about C?
- Do something else.
When you click on one of the first three links, you are shown a short passage which concludes with a link back to the scene you just came from. However, when the scene draws again, the link you just followed is disabled. You could easily imagine generalizing the visited property of a scene or a link, to the visited-some-number-of-times (2,3,4,...) property of a scene or link. This might come up in a scene with a genie that has a make-a-wish link on it, after the third time you click the link, it becomes disabled. We call a story progressive if whenever there is a loop in the story scenes, there is a tracked quantity, important to game play, that increases so that we never see the same scene twice with the same value of that quantity. Life simulators are an important category of CYSA game, where you go through a cycle of groups of scenes for different times of the day, week, year, etc., however, when you come back to the start of the cycle again, some larger tracked unit has advanced. The fun in playing such simulators is to watch how the characters change or transform over that larger unit.
Rather than just track a single quantity to determine the passages and the links to display in a scene, one could imagine tracking several quantities. For example, how hungry you are as well as how tired you are. Your choices could affect the values of these quantities. You can then have passages or links display based on a combination of these values. For example, the "Cook boots and eat them" link in a scene might only display if you are at least 9 hungry and less than 5 tired.
Often interactive fiction is written such that the reader is the main character, so from the second person perspective. (You did this... You did that...) To enhance the level of immersion, it is common to allow the user to do character customization. This involves allowing the user to choosing the initial values of a collection of tracked quantities and values. Some simple values that might be tracked are the player's name and gender. Such tracked values are often periodically substituted for in passages wherever they are needed. You can also imagine letting the player choose their initial hair length, occupation, etc., but still allow these to change over the course of the game.
In describing a scene to someone else, it is natural to go through a checklist such as the following:
- Describe the location.
- Describe who and what was there.
- Describe what happened.
In the CYSA setting, we might conclude this with a list of plausible things the main character could do next. Let's look at each of the three items above in turn. In describing the location, in the CYSA setting, we might describe some of the tracked quantities of that location. For example, we might track the conditions of a road. This quantity changes depending on when the main character comes to the road: sometimes it is dry, wet, icy, etc. The second item illustrates that where people and objects are might vary over the course of the choices of the CYSA game, so the description of a scene should adapt to handle this. For example, the player might come to the locked, castle door with a key or may come to the locked, castle door without a key. As we can see from the first two points, making a CYSA story potentially involves keeping track of many quantities. The last point, (3) above involves figuring out how these quantities changed based on (1) and (2), and then describing the result. In general, this kind of bookkeeping is much easier for a computer to do than for a human to do.
Graphics in Interactive Fiction
Popular interactive fiction is consumed digitally, on computers, tablets, phones, etc. Computer graphics available on such devices is frequently used in interactive fiction. In this subsection, we look at some common ways that graphics can be used in Interactive Fiction, so as later to better be able to describe the capabilities of FRISE.
At its simplest, an image or video may be displayed with a given scene. If the work is a CYOA, and displayed digitally with graphics, it often called a visual novel.
Even amongst visual novels, there is a lot of variation in how images are displayed. For example, in each scene one might have one or more images that do not take up the whole screen, acting almost as hanging pictures or illustrations of the scene. More immersively, one might have a background image that takes up the whole screen, over which the narrative text is displayed. As the narrative unfolds additional images might be displayed over this background.
In life simulators, it common to have a base image, corresponding to an object in the game, which is then overlaid with additional images to track how this object is equipped. A popular component of such games is to dress the character for the day at hand, by overlaying on the base image of the character, various articles of clothing, armor, etc. Such composite images are called paper dolls. To add and remove clothing, one might click on a particular body part image.
This example takes one to the boundary of what is often considered to be a work interactive fiction because we are now clicking on images rather than text. Another popular situation on this boundary might be a scene presenting an image of a room where the user can click on various parts of this image to see descriptions of those objects. Stories with elements like this or clickable paper dolls belong to a broader category of choice-based video games or maybe turn-based RPGs (role-playing games). Because of the importance of text descriptions, though, are still considered interactive fiction.
An RPG is typically a video game in a fixed world where you manage a single player or small party of players and over the course of the game you develop these characters according to some well defined set of characteristics, such as experience, money, etc. So this is similar to a CYSA except there is no emphasis on text narrative and choices. So the narrative might be conveyed visually or through a combination of video and audio interaction with only minimal text for displaying character statistics. World navigation might be controller based. Less extreme than this, corresponding more closely to interactive fiction, are RPGs where the players move directionally on a map, say using arrow or W, A, S, D keys and can bump into objects at which point text is displayed and choices may be given. We view this kind of game as a final category of game with graphics that might still be considered interactive fiction.
FRISE and Story Engines
We are now in a position to say some of the basic things a story engine does:
- It reads in the files the story author used to represent the story, extracting scenes (in FRISE terminology locations), objects, and tracked quantities, and initializes them. This may be done all at once at the start of the playing a game, or incrementally as the game progresses.
- It locates what scene should be presented first. Based on the current state of the locations, objects, and tracked quantities, it outputs this scene to the player.
- It waits for and interprets player inputs.
- It updates the states of the locations, objects, and internal states according to choices the player makes.
- It then presents the appropriate next scene and waits for more player inputs.
In addition to the above, a story engine might also:
- Provide a suite of useful text effects for controlling how text is shown to the user.
- Keep a record of the sequence of choices the user has made. Often interactive fiction players want to do things like "find all the possible endings", or "try different paths to try to find the best ending." To facilitate this, most engines support: saving the current game state, loading a game from a file, as well as forward and backward history actions to back out or redo choices. If the current game has ended or seems to be going really bad, the user might want to play again or restart.
- Allow the player to inspect their own character's and other characters' statuses.
- Allow the player to see their current inventory, what objects they have with them, or in general, inspect what are the objects at a location.
- Allow the user to manipulate a paper doll representing the state of how some object in the game is equipped.
- Allow the user to navigate between scenes using visual maps.
Besides FRISE itself, some popular interactive fiction platforms that handle story engine activities are Twine, Ren Py, RPG Maker, Inform. For each of these, the file format of the story is not HTML, but often can be compiled to a format that can be displayed on the web. I.e., HTML and Javascript or HTML and Web Assembly. Some of these also have a what-you-see-is-what-you-get (WYSIWYG) editor which can be convenient for simple CYOA and CYSA stories, but is less convenient for more complicated ones.
FRISE uses HTML as its file format as HTML is easy to learn and can be used more generally than just for story writing, increasing the odds people already know most of FRISE's tags -- or at least, can learn them quickly. It uses standard Javascript and CSS (Cascading Style Sheets) for more complicated effects, as again, these are the most popular languages for scripting on the web.
In general, it is possible to write a CYOA story for any file format that supports links between documents. CYOAs have been written for HTML, PowerPoint, PDF, epub, markdown, plain old paper from trees, etc. To handle CYSA possibilities, though, these formats are generally lacking without some additional augmentation. Even for CYOAs, there are advantages to using a story engine. To see this consider trying to write a CYOA using a collection of web pages (using just HTML, without any Javascript library or CSS files). You could view such a CYOA in a browser, you could use the browser's back and forward buttons for history. Using the browser's Save Page As... feature, you might even be able to "Save" games, although this would likely be fragile. From an author's perspective, some tasks would be awkward. For example, suppose you want all the times that a character speaks, that an icon of that character shows, that text of who the character is displays, and that the text is formatted in a particular way. You could repeat the HTML code for this in all places where the character speaks. What happens if you want to modify the appearance of a character speaker? You have to change many places. Thus, it makes sense to pull out a lot of these kinds of features useful for interactive storytelling into at least a common cascading style sheet. To do CYSA activities like character customization, tracking, modifying, and displaying state based components of a scene, one pretty much needs a scripting language and it makes sense to group common activities for interactive story telling into one script -- this is exactly what FRISE does. It is also small (less than 125 kilobytes including source comments), so if you know Javascript, it is not too hard to understand what the code is doing.
Enough background! Let's start seeing how to write interactive fiction in FRISE!
A First Interactive Story in FRISE
Get an Editor
To write a FRISE Story, you need a text editor. It doesn't really matter which editor you choose, but you want an editor that writes plain text files without inserting special characters when you save. For example, Notepad on Windows would work, but Word or Google Docs are probably not your best choice. We recommend Pulsar as it is works on Windows, Mac, and Linux and is open source. It is the successor to the Atom Editor created by GitHub. Atom, though, was closed down by Microsoft after they were bought GitHub. Microsoft's Visual Studio Code also works, as does Apple's Xcode. Other popular editors include Sublime, VIM, Emacs. Finally, for games without images, it is possible to get them to run in browser-based IDEs such as https://ide.geeksforgeeks.org/online-html-editor, the only tricky thing is to give complete URLs when including the FRISE css and Javascript to make sure the game code will run. I.e.,
https://www.frise.org/example_games/frise/css/game.css
rather than the relative path frise/css/game.css and
https://www.frise.org/example_games/frise/js/game.js
rather than the relative path frise/js/game.js .
Make Sure You Can See File Extensions
The file extension is the part of a file name after the final period in the name of a file. For example, if the file name was foo.txt, the file extension is txt . File extensions are often used to tell the computer or browser what kind of file it is dealing with. This allows the computer or browser to open the file correctly. As most humans don't care about the file extension, it became common practice not to show the extension when displaying the file name on many operating systems. We will be interested in creating web pages to make FRISE stories. I.e., files that have the extension html. However, often text editors save using the default file extension of txt. It can happen that you can save a file with a name like foo.html thinking you are saving an HTML file, but because you can't see the file extension, you are in fact saving a file whose name ends with html.txt, which will show in a browser as a plain text file rather than a normal web page. Here are some links to see File extensions on Windows 11 and File extensions on macOS.
Prepare a Folder for Your Story
The typical folder structure for a FRISE story looks like:
name_of_story
 index.html  (your story)
 images (a folder of images used by your story)
 frise  (the folder with the frise code)
For each category of files you might have, you could add a separate sub-folder. If a particular category has too many files in it, you might want to split it into sub-categories. For example, if your project has lots of a cat and dog images, has short video clips and audio clips, and you created your own custom Cascading Style Sheets (css) and Javascript scripts, you might use the structure:
name_of_story
 audio
 css
 index.html
 images
   cats
   dogs
 frise
 js
 video
Web pages in general are cross-platform. To help ensure this, you should avoid punctuation characters (you can use _ and -) in file names and try to stick to lowercase names and extensions. If your story uses media such as images and video, you should be aware that the choice of file format can affect file size a lot, and hence, how big your project will be to download if you host it somewhere. For example, the fork image used in the example on the main page of this web site was generated using DALL E 2, an older image generator from OpenAI. The original image was a png, a compressed but lossless format, and was about 1.8 million bytes. This was then cropped to its current dimension 366x480 using the Preview app that comes with Mac, giving a png of size 247 thousand bytes. Converting it to jpg file, a lossy file format, produces an image that is hard to tell from the previous png, but that takes only 60 thousand bytes. If you were to convert it to webp (this can be done using a program like ffmpeg, but not currently by Preview), the file size would be 13 thousand bytes.
One easy way to get a good starting structure for your game is just to get the Example Downloads, rename the folder to what you want, and delete the examples but leave the frise subfolder and images subfolder (deleting images you don't want). Then create and start editing an index.html file in this folder.
Create an HTML File
An HTML document is built by nesting different kinds of tag pairs (formally, called elements) to say how the document should look. A tag pair consists of a start tag, which might look something like <tag_name>, and an end tag which would look </tag_name>. HTML has a fixed list of allowed tag names, some of which we will briefly introduced below. It also allows the use of experimental tag names which begin with x- and can be followed by alphabet letters (upper or lower case), _, -, or digits. Tags are required to nest correctly, so
<x-a>
  <x-b></x-b>
</x-a>
is okay, but
<x-a>
  <x-b></x-a>
</x-b>
is not. Let's look at a minimal HTML document:
<!doctype html>
<html lang="en">
<head>
   <title>Minimal HTML File</title>
</head>
<body>
</body>
</html>
You could make this document by using one of the text editors we discussed earlier, typing or copy-pasting the text in, saving it. To then view it, you could double-click on the saved file in your File Explorer. The line <!doctype html> indicates to the browser the version of HTML being used, in this case, at least HTML 5. I.e., it tells the browser a modern version of HTML is being used. After this declaration, any valid HTML document begins with a <html> tag and ends with a </html> tag. The html element is required to have two children: a head element and a body element. The head contains information about the whole document. It needs to have at least a title element, but might also contain meta elements to describe the content of the document, and link elements used to associate style sheets and other documents with the current one to be used by the browsers drawing the document. The body element contains the main content a user sees in the browser window when the document is displayed. In the case above, the body tag has no content. Below is what the above document looks like in Firefox:
Notice the title text appears in the tab name, but the content of the browser screen is white -- the body element had no content, so nothing was displayed. One last thing to point out about this example before we leave it, is that the open html tag is written as <html lang="en">. Here lang="en" is what is called an attribute. In this case, it tells the browser that the text language used within the document will be English, fr would have indicated French, es indicates Spanish, etc. An attribute has either the format attribute_name="attribute_value" or attribute_name='attribute_value' . Most browser will also understand if you drop the quotes entirely. In general, the allowed attributes of a start tag depend on the start tag. HTML considers any attribute name that begins with data- followed by alphabet letters (upper or lower case), _, -, or digits, a user-defined attribute and treats it as legal.
Let's briefly look at some HTML elements which can appear in the body of an HTML document, before giving our first FRISE example. Body elements come in two main types: Block elements which are rendered by the browser within some kind of rectangular region, and Inline elements which affect some property of the text within a block level element. We first give some block elements:
- h1, h2, ..., h6: These are heading elements and are used to give a heading for a passage in a document.
- ul, ol: These are respectively unordered and ordered list container elements. They typically contain one or more li, list item, children.
- p: A paragraph element is used to represent a paragraph of text. It may or may not have a text-indent as the start of its first line.
- div: A division element is used to represent a generic container for text.
- hr: A horizontal rule element is used to draw a horizontal line. This element may be written with or without a close tag. I.e., one can write either just <hr> or <hr></hr>.
Some example HTML inline elements are:
- br: A break element is used to indicate a line break. Like the <hr> element, using a close tag with this element is optional.
- a: An anchor element is used to link the current HTML document location to another location either within the current document or a different document. This might look like: <a href="destination_url">link_text</a>. This will be drawn by the browser as a link with text link_text which, when clicked, will take the user to destination_url. If destination_url ends with #some_fragment, then the default browser behavior is to scroll to where in that document there is a tag with attribute id="some_fragment".
- img: An image element is used to indicate an image should be drawn at this point in the document. A typical format for the use of this tag is <img src="url_to_image_file" alt="What to display if the image cannot be found or if browser has images disabled" >. Like the <hr> and <br> elementw, using a close tag with this element is optional.
- b: A bold element is used to indicate a range of text should be in bold face.
- i: A italic element is used to indicate a range of text should be in bold face.
- span: A span element is used to indicate a generic inline region of text.
Within an HTML document, you can use <!-- some comment --> to write a comment in your code which will be ignored by the browser when rendering your document. Below is a simple html document illustrating some of these tags in action:
<!doctype html>
<html lang="en">
<head>
   <title>An HTML Document Illustrating Common HTML Elements</title>
</head>
<body><!--This is an example HTML comment -->
    <h1>An HTML Document with Some Common Elements</h1>
    <p>Once upon a time, there was a young tag that wanted to rule the world.
    Its name was <b>hr</b> and it looked like:</p>
    <hr id="hr_tag">
    <div>Many tags felt a <i>chill</i> when hr was near them. This
    was for three reasons:
    <ol>
    <li>hr was always acting as a separator.</li>
    <li>hr had a linear way of thinking.</li>
    <li>hr was very thin-skinned.</li>
    </ol>
    </div>
    <p>It was well-known that the br tag wanted to take a break<br> from him.
    </p>
    <p>The first <a href="#hr_tag">a</a> tag twin by contrast seemed somehow directly
    linked to him, the second twin thought he was a <a href="https://www.yahoo.com/">yahoo</a>.</p>
    <p>The hr tag hardly noticed as he was more interested in the img tag --
    she was a real looker:</p>
    <img src="images/frise_gal.webp" alt="An image of the Frise Gal">
</body>
</html>
To see this example you can either try to type it in and save it in your text editor, obtain it as part of the FRISE Download or view the common html element example online. To see the within-document a tag link in the above code in action, you will need to make your browser window tiny, so that the HTML document uses a scroll bar to completely display.
Create an HTML File with a FRISE Game in it
Let's now look at a minimal HTML document containing a FRISE story.
<!doctype html>
<html lang="en">
<head>
   <title>A Minimal FRISE Game</title>
   <meta charset="UTF-8" >
   <link rel="stylesheet" href="frise/css/game.css" >
   <!--You could link your own/other stylesheets here-->
</head>
<body>
<x-game>
<x-object id="main-character">
   <x-position>start</x-position>
   <x-name>Frise Guy</x-name>
   <x-icon>images/frise_guy.webp</x-icon>
</x-object>
<x-location id="start">
    <x-present>
    <h1>The Adventure Begins</h1>
    <img src="images/fork.webp" alt="A left road and a right road separated by
       a giant stainless steel fork -- Made in Dall-E" class="rounded" >
    <x-speaker name="main-character">Whoa! That's a big fork!</x-speaker>
    </x-present>
</x-location>
</x-game>
<script src="frise/js/game.js" ></script>
<!--You could link additional Javascript code here-->
</body>
</html>
The code above is actually a subset of a slight modification of the code on the FRISE landing page. It is a game consisting of a single scene and looks like:
If can be found as part of the FRISE Download. It introduces three new standard HTML tags we haven't seen in action before <meta>, <link>, and <script>. The <meta> and <link> tags, like <hr>, <br>, <img>, do not need to be closed. The <meta> tag is used to provide information about the overall document, in this case, that the document is encoded using a particular Unicode format. The <link> says to use the file frise/css/game.css as a stylesheet for the current document. The <meta> and <link> tags can only be used within the <head> element. Finally, the <script> tag says load and run the code in the file frise/js/game.js. <script> tags can occur in the head or body of an HTML file, but as they often block the rendering of web pages until they finish loading and running, they are traditionally placed towards the end of an HTML file. As we said before, tags beginning with <x-...> are valid modern HTML, but by default the browser doesn't have an individualized way of processing them, so if we didn't have any CSS and Javascript files associated with the HTML document with instructions about them, they would be treated as generic block-level elements. I.e., as if they had been <div> tags. The frise/js/game.js script is where we tell the browser how to execute these tags, however, CSS files, and this one in particular, have an important role in controlling how the document looks, so we'll unpack a little how CSS works before discussing the rest of the code. A CSS file contains a sequence of CSS declarations. A CSS declaration looks like:
some_selector_path_1,
...
some_selector_path_m {
    some_property_of_an_element_1: value_1;
    ...
    some_property_of_an_element_n: value_n;
}
For example, consider:
p.red #foo span
{
    color: red;
    font-size: 10px;
}
This selector says look for <p> elements whose start tag has a class attribute that contains red (I.e., <p class="maybe_other_stuff red maybe_other_stuff">). Then, within this element, look for a descendant element with id="foo", then within that element try to find a span element. If this complete path is found, the declaration says, color the text of that span element red, and use characters at most 10 pixels high for the text. This declaration had only one selector path, but if there were more than one (comma separated), the style commands would apply to all of them. In the case of a FRISE game, we initially don't want any of the text within the <x-game> element to display until the appropriate time, so the frise/css/game.css stylesheet has the declaration:
x-game,
x-action
{
   display: none;
}
This says don't show anything within an x-game or x-action element. In our FRISE story code, we see that the img element's class attribute has rounded as its value. This will match with the following declaration in the FRISE stylesheet:
.rounded
{
    border-radius: 20px;
}
which will cause the corners of the image to be drawn rounded. As a last example of something the FRISE stylesheet does, we note the FRISE Javascript detects if the current browser is a mobile device or if the language being displayed is a right-to-left language. In the former case, it adds mobile to the html element's class attribute and in the latter adds rtl to the html element's class attribute. Using this, the FRISE stylesheet can appropriately modify how to display certain aspects of the game, for example, by setting the text-direction to be right-to-left:
.rtl
{
    direction: rtl;
}
Returning to the story code, the script tag in the code loads and runs the frise/js/game.js script. This script mainly just declares what functions, classes, etc. it has so that the browser knows about them. It then sets up a callback request to the browser on the whole window to call a function initGame() after the rest of the document has done loading. This is because it needs to wait until the browser has finished loading the whole game document and built a so-called Document Object Model (DOM) for it to run properly. The Javascript function initGame(), is the main entry point function in the frise/js/game.js script. initGame() will use the browser's DOM to extract from the x-game element information about the story.
A FRISE game (when talking about FRISE we will tend to use the words game and story interchangeably) consists of a collection of game objects and game locations. A game object is defined using the x-object element. It is used to represent a person, a thing, etc. in the game. A game location is defined using the x-location element. It is used to represent places where a game object could be. In addition to objects and locations, FRISE also uses the x-action element to represent an action snippet of Javascript that can be called. In a FRISE story, each instance of x-object, x-location, x-action is required to have an id attribute and the value of that attribute must be unique. So a given x-object (or x-location or x-action) cannot have the same id as another x-object, x-location, or x-action. This is actually convenient for writing stories as you can use your editor's Find feature to quickly find an x-object, x-location, or x-action even in a large document. All FRISE games are required to have a game object with an id with value main-character and this object must be positioned at a valid game location. Thus, a minimal FRISE game has to have at least one game object and one game location. The FRISE script will always draw the scene given by the location the main-character object is at.
In our story code, one can see there is an <x-object id="main-character"> tag. To position this object, this x-object element has an x-position element whose contents are start. This says the main-character is positioned at the game location whose id is start. If we look further in the code we see there is a <x-location id="start"> tag. This is the location which the FRISE script will initially draw. The rest of the main-character code in our example defines properties of the main-character: the x-name element says the main-character has a property name whose value is Frise Guy, the x-icon element says the main-character has a property icon whose value is images/frise_guy.webp. In general, you can feel free to make up whatever properties you want for your objects. For example, you could specify an honorific property whose value is Doctor for your object by adding <x-honorific>Doctor</x-honorific> to a game object's x-object definition. We will see in a moment how we can tell FRISE to draw or alter the value of a property. The name and icon properties are particularly useful, because they are used in presenting scenes that have an x-speaker element.
To complete this first FRISE code example, let's look at the start location. A game location, like a game object, can have properties, and you are free to add properties using <x-some-property>value</x-some-property> code within its x-location definition. By default, the FRISE script will populate a game location's items property with the list of all objects positioned at it. To render a location, the FRISE script looks at each x-present element within it in sequence. If the x-present does not have a ck attribute, or the condition in the ck attribute is met, then the contents of the x-present are added to a div element with id='game-content' within the body element of the HTML document that is the game. This causes the HTML from the x-present element to become visible in the browser. The FRISE script also adds to each x-speaker tag in the game-content div, additional code so that the name property is displayed and so that it has an img element using icon 's value as the src attribute's url. So in the case of our first FRISE story, when the start location is rendered, we will see the h1 element, the img element with an image of a fork, and the modified x-speaker element with the name and icon of the main-character.
Game URLs - Links and Buttons
Readers interact with a FRISE story typically by clicking on links (a elements) or x-buttons of the currently displayed scene. Links can either be to a different web page or can be to within the current document. Links to outside the current document are treated as normal web page links and cause the browser to go to whatever web page was requested. So a clicking a link <a href="https:/www.yahoo.com/">Yahoo</a> will take you out of the story and to the Yahoo! homepage. In-story link urls all begin with the sharp symbol, #. When an in-story link is clicked, the FRISE Javascript computes one turn of the story/game. During a turn, the url of the link or button is used to determine any initial actions that need to be carried out and then the main-character is moved to a new location specified by the URL. Finally, each object and location is given an opportunity to compute some code on how to update itself. Let's look at a small example:
<!doctype html>
<html lang="en">
<head>
<title>A FRISE Game With Anchors and Links</title>
<meta charset="UTF-8" >
<link rel="stylesheet" href="frise/css/game.css" >
</head>
<body>
<x-game>
<x-object id="main-character">
<x-position>start</x-position>
</x-object>
<x-location id="start">
<x-present>
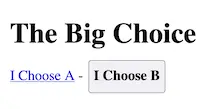
<h1>The Big Choice</h1>
<a href="#choose-a">I Choose A</a> -
<x-button href="#choose-b">I Choose B</x-button>
</x-present>
</x-location>
<x-location id="choose-a">
<x-present>
<h1>Choice A</h1>
<p>You have arrived at Choice A</p>
<p><a href="#start">Go back to start</a></p>
</x-present>
</x-location>
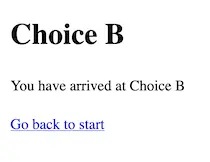
<x-location id="choose-b">
<x-present>
<h1>Choice B</h1>
<p>You have arrived at Choice B</p>
<p><a href="#start">Go back to start</a></p>
</x-present>
</x-location>
</x-game>
<script src="frise/js/game.js" ></script>
</body>
</html>
The above code can be found in the FRISE Download. You will notice that each location in this example, as well as in our previous examples, begins with an h1 heading for the location output. There is no requirement to do this, but it can make it easier for player's to know how your scenes are changing. This particular example has three locations which look like:
All of this story's anchor tags and x-button elements have in-story links. That is, the values of their href attributes all begin with #. An x-button is a FRISE tag that can be used in same way as an anchor tag, but is drawn as a button. Each of these urls does not have a semi-colon in it, so FRISE will not try to determine an action to carry out before following the link. The rest of each link url says which location the main-character should go to if the link is clicked. So <a href="#choose-a">I Choose A</a> says the main-character should be moved to the location with id value choose-a if it is clicked. In the case of this game, none of the objects or locations specify an default action to take before the new location is rendered, so clicking on the I Choose A link will immediately draw the location of the present tags location choose-a.
Actions and Default Actions
In-story urls can also specify a set of actions to run before moving the main-character to a new position. The general format on an in-story url is:
#action_1_name;action_2_name;...;action_n_name;next_location_id
Such a url would execute the Javascript code in the x-action elements with id 's action_1_name, action_2_name, ..., action_n_name, then it would move the main-character to next_location_id. Let's take a look at a FRISE story that uses these more complicated urls:
<!doctype html>
<html lang="en">
<head>
    <title>A FRISE Game Using Actions</title>
    <meta charset="UTF-8" >
    <link rel="stylesheet" href="frise/css/game.css" >
</head>
<body>
<x-game>
<x-object id="main-character">
   <x-position>start</x-position>
   <x-money>0</x-money>
</x-object>
<x-location id="start">
    <x-visits>0</x-visits>
    <x-present>
    <h1>Earn Money</h1>
    <p>You have visited this location ${loc('start').visits} times.</p>
    <p>You currently have ${obj('main-character').money} dollars.</p>
    <p>What would you like to do:</p>
    <ul>
    <li><a href="#click-links-for-money;start">Click links for a $1</a></li>
    <li><a href="#barista(5);start"
        >Work as a barista for 5hrs at $15/hour</a></li>
    <li><a href="#barista(8);start"
        >Work as a barista for 8hrs at $15/hour</a></li>
    <li><a href="#reset;start" >Restart Game</a></li>
    </ul>
    </x-present>
    <x-default-action>
        if (obj('main-character').position == 'start') {
            let visits = parseInt(loc('start').visits);
            visits++;
            loc('start').visits = visits;
        }
    </x-default-action>
</x-location>
<x-action id="click-links-for-money">
    let money = parseInt(obj('main-character').money);
    money++;
    obj('main-character').money = money;
</x-action>
<x-action id="barista">
    let money = parseInt(obj('main-character').money);
    let pay = parseInt(args[0]) * 15;
    obj('main-character').money = money + pay;
</x-action>
<x-action id="reset">
    game.reset();
</x-action>
</x-game>
<script src="frise/js/game.js" ></script>
</body>
</html>
As with the other example games, the above code can be found in the FRISE Download or Viewed Online. This example consists of one location start, and all of the game links after performing their actions go to start. The example illustrates in-story urls where the game action is referenced with (#barista(5);start) and without an argument (#click-links-for-money;start). The latter case, says perform the code in action click-links-for-money then go to the start location. The code in the click-links-for-money action is:
let money = parseInt(obj('main-character').money);
money++;
obj('main-character').money = money;
In the above, obj is the name of a Javascript function, a piece of Javascript code that can be executed on demand. The notation obj('main-character') says execute the code associated with obj using the string 'main-character', the parameter of the function. In this case, this obj function uses the name provided to return the game object corresponding to the main-character. Given a Javascript object some_object, we can access a property some_property of it using the notation some_object.some_property. So obj('main-character').money refers to the money property of the main-character object. In the game above, this was initially set to 0 by the x-money element in the HTML. In a FRISE game, all property of objects or locations set by HTML code are initially strings (a sequence of character) rather than numbers. In Javascripts operations like '+' behave differently according to the type of the operands. So "hi" + "there" is the string hithere and "7" + "3" is "73"; whereas, when we add the numbers 7 + 3 we get 10. To convert a string into an integer, if that is possible, we can use the Javascript function parseInt. The line let money = parseInt(obj('main-character').money); says make a new temporary variable (a place to store something in Javascript) named money (this is what let does), then take the value of the money property of the main-character object, convert it from a string to an integer, and copy it into this temporary variable. The next line money++ say add one to the value currently stored in money. Finally, obj('main-character').money = money; says copy the value from the temporary variable back into the main-characters 's money property.
We can display the value of properties of game objects and game locations, or for that matter, any Javascript expression using the syntax ${ expression_to_display } anywhere within an x-present element. So the line in the above game's start location's x-present element:
<p>You currently have ${obj('main-character').money} dollars.</p>
will print out the current value of the main-character 's money property. If this property currently is a number, Javascript will automatically convert it to a string before printing it.
The two in-story urls #barista(5);start and #barista(8);start each call the barista action with an argument. In general, it is legal to have multiple arguments, for example #some_action(arg_1, arg_2,...arg_n);... When given such a URL, before FRISE starts executing the code of the action it creates a Javascript array args, a sequence of variables indexed by the numbers 0, 1, 2..., with the values of the arguments. So args[0] will get the value of the first supplied argument, args[1], the value of the second, etc. Thus, when barista(5) is being processed args[0] will get the value 5. So if we look at the code for the barista action, the first line will create a variable money with the value of the number parsed from the main-character 's money property. The second line creates a variable pay with the value 5 parsed as a number from args[0] times 15 (* means multiply). Finally, the last line adds these two quantities and stores the result back into the main-characters 's money property.
The last in-story link in the example above, #reset;start, calls the reset action. This action has a single line game.reset() . Here game is a variable created by FRISE when initGame() is executed. It has two main properties game.objects and game.locations which are used to store all the game objects and game locations of the game. It also has several useful member functions (aka methods) useful for managing a FRISE game. Over the course of this, or any CYSA game, the value of objects and locations may change. The reset member function empties game.objects and game.locations, then re-parses the objects from the HTML document of the game. Going to the start location after calling the reset action, thus, effectively restarts the game.
We have written the x-action elements above outside of any x-object or x-location. It is also legal to write them inside and may be convenient to do so if it helps keep game actions near the locations and objects which call them.
The last piece of the FRISE story above we have yet to explain is the x-default-action element within the start location. Any object or location can have a default action defined by such an element. If it has one, then this code will execute once per game turn, after the main-character has been moved, but before the current location is presented. The default action code for the start location:
if (obj('main-character').position == 'start') {
    let visits = parseInt(loc('start').visits);
    visits++;
    loc('start').visits = visits;
}
uses a Javascript if statement. An if statement has the format if (some_condition_is_met) { ...} is processed by first checking whether some_condition_is_met is true, if it is, then the code in {} is processed, otherwise, it is not. In this case, the condition is checking whether the main-character is currently at the start location. As there is only one location in our game, and we did position the main character there, the condition holds. So the next three lines run and add 1 to the visits property of the start location. Although, in this case, using an if statement to check that the main-character is at the location is unnecessary, it is actually a useful idiom to use for more complicated games where the main-character is moving and we might not want to do some action unless the main-character is currently at some location.
One final point about using x-action and x-default-action. If the code within the element uses the < or > symbols, then the browser can become confused and think it is part of a tag, and so not process your game document correctly. On the other hand, browser's are clever enough to ignore < or > symbols within script tags. For this reason, FRISE supports writing x-action and x-default-action elements with the alternative syntax:
<script type="text/action">
// some code
</script>
and
<script type="text/default-action">
// some code
</script>
respectively.
Presentations with Conditions
In the last game example, we saw how we can use Javascript if statements to conditionally execute code in a default action. The next game example shows different ways to conditionally show text when presenting a location.
<!doctype html>
<html lang="en">
<head>
    <title>A FRISE Game Using Actions</title>
    <meta charset="UTF-8" >
    <link rel="stylesheet" href="frise/css/game.css" >
</head>
<body>
<x-game>
<x-object id="main-character">
   <x-position>start</x-position>
   <x-money>0</x-money>
</x-object>
<x-location id="start">
    <x-present>
    <h1>Earn Money</h1>
    <p>You currently have ${obj('main-character').money} dollars.</p>
    <p>What would you like to do:</p>
    <ul>
    <li><a href="#click-links-for-money;start">Click links for a $1</a></li>
    </ul>
    </x-present>
    <x-present ck="parseInt(obj('main-character').money) >= 2">
    <ul>
    <li><a href="#movie">Go to $2 movie night</a></li>
    </ul>
    </x-present>
    <x-action id="click-links-for-money">
        let money = parseInt(obj('main-character').money);
        money++;
        obj('main-character').money = money;
    </x-action>
</x-location>
<x-location id="movie">
    <x-present ck="parseInt(obj('main-character').money) >= 0">
    <h1>At the Movies</h1>
    <p>You decided to use your hard-earned cash to enjoy a movie.
    You purchased a ticket and found a seat in the theater.</p>
    <p>And then...</p>
    </x-present>
    <x-present ck="parseInt(obj('main-character').money) >= 0"
       stage="pause(2000)">
    <p>The theater went dark and the movie began to play. But there was no
    sound. So you shouted, "Turn on the sound!"</p>
    </x-present>
    <x-present ck="parseInt(obj('main-character').money) >= 0"
       stage="clickProceed('You looked around...')">
    <p>You could dimly see the outline of the projectionist at the
    back of the theater fumbling with his equipment. Finally, you
    got to see the movie and it was awesome. Thoroughly satisfied,
    you returned to your flat and fell asleep...</p>
    <p><a href="#reset;start"
        >You woke up the next day ready for work...</a></p>
    </x-present>
    <x-present ck="parseInt(obj('main-character').money) < 0">
    <h1>You're Broke!</h1>
    <p>You don't have enough money to see the movie.</p>
    <p><a href="#reset;start">You lose, but decide to play again.</a></p>
    </x-present>
    <x-default-action>
    if (obj('main-character').position == 'movie') {
        let money = parseInt(obj('main-character').money) - 2;
        obj('main-character').money = money;
    }
    </x-default-action>
</x-location>
<x-action id="reset">
    game.reset();
</x-action>
</x-game>
<script src="frise/js/game.js" ></script>
</body>
</html>
The above code can be found in the FRISE Download or Viewed Online. This game has two locations. You start out with 0 dollars. The main-character 's money property is used to track this. At the first location, start, there a is a link to: "Click links for a $1". This executes the click-links-for-money action and then goes back to the start location. The code for click-links-for-money was discussed in the previous game example. Unlike any of our previous examples, the start location now has two x-present elements, and the second one has the attribute ck (called a check condition -- you can in fact use check rather than ck if you like) with value parseInt(obj('main-character').money) >= 2. This gets the main-character 's money property, a string, converts it to an integer and compares it with 2. If money is greater than or equal to 2, the check condition is satisfied, otherwise, it is not. If the condition is satisfied then the contents of the x-present are shown. In general, FRISE will show all the x-present elements that either don't have a check condition, or whose check conditions are satisfied. Further the order of presentation will be as written in the HTML. Although the above FRISE story only uses check conditions with a single comparison, one can in fact use any Javascript boolean expressions. Expressions like the above are boolean expressions. Besides simple boolean expression, if b1 and b2 are boolean expressions, so are b1 && b2 (which is satisfied if and only if both b1 and b2 are), b1 || b2 (which is satisfied if and only if either b1 is satisfied or b2 is satisfied), and !b1 (which is satisfied if and only if b1 is not satisfied). In addition, to ck conditions, FRISE supports else-ck conditions. For example,
<x-present ck="obj('sky') == 'blue'">
    <p>What a lovely day!</p>
</x-present>
<x-present else-ck="obj('sky') == 'gray'">
    <p>It seems cloudy!</p>
</x-present>
<x-present else-ck="true">
   <p>I don't know what the weather is.</p>
</x-present>
In the above, if the ck condition on the first x-present element is satisfied, FRISE won't attempt to check the else-ck 's, and so their x-present elements won't be display. On the other hand, if obj('sky') == 'gray' holds, the first ck condition will fail, so that x-present won't be shown, the second x-present will be displayed as its else-ck holds, and the last else-ck won't be evaluated. If obj('sky') == 'pink' , the first two x-present 's won't be display, else-ck="true" trivially holds, and so the last x-present will be displayed.
Sometimes you might want to nest conditional checks, for example, you might want to vary the scene that is presented by day, then for a given day, vary the text by what character's are present. Although you can accomplish this by having a sequence of ck's, each of which has a boolean combination of day and character conditions, this makes for awkward looking code. FRISE does not support nesting x-present elements, however, it does support data-ck="some_condition" attributes on any HTML tag which can achieve this desired result:
<x-present ck="baseLoc().day == 3">
  <div data-ck="obj('cool-guy').position == here()">
  The cool guy is here.
  </div>
</x-present>
In the above FRISE story, if you have at least $2 at the start location, you will see a link to go see a movie. Clicking this link takes you to the movie location. Looking at the code, one can see the default action of the movie location is to debit the amount of money of the main character by $2, corresponding to purchasing a movie ticket. Recall presenting a location occurs after the default actions are all done. A ticket purchase should only be successful if you have at least 0 dollars after the purchase. The conditions on the first three x-present elements of the movie location check this. So they correspond to what you will see if you could purchase a ticket. The last x-present check handles the case where the amount of money you have is less than zero to present something else. You can get the less than zero case if you stay on the movie location and click reload a few times (each time debiting $2) until your money goes negative.
If you look at the second two x-present elements of the movie location, you see they each have a stage attribute. This controls the staging/arranging/mise-en-scène of the given x-present element. I.e., what goes on before the contents of the element are presented. Currently, FRISE supports two options for stage, either pause(some_milliseconds) which waits some_milliseconds many milliseconds before showing the contents of the x-present, or clickProceed(link_text) which displays a link with text link_text that must be clicked before the contents of the x-present are displayed. In the above code, we pause two seconds, before displaying, "The theater went dark...". Then we present a link with text, "You looked around...", which when clicked shows, "You could dimly see..."
Moving Objects and Non-Player Characters
In our examples so far, we have only used default actions on locations, and we have wrapped our code to always check that the main-character is at the location before doing anything. The next example has an object with a default action that executes every turn. It shows that FRISE can be used to write games where objects move around according to some rules. I.e., we could write games with non-playing characters (NPC) with some weak kind of AI behavior.
<!doctype html>
<html lang="en">
<head>
    <title>A FRISE Game With Objects That Move
    </title>
    <meta charset="UTF-8" >
    <link rel="stylesheet" href="frise/css/game.css" >
</head>
<body>
<x-game>
<x-object id="main-character">
   <x-name>You</x-name>
   <x-position>office</x-position>
</x-object>
<x-object id="sarah">
   <x-name>Sarah</x-name>
   <x-position>office</x-position>
   <x-icon>images/sarah.webp</x-icon>
   <!--Sarah's icon was the Dall-E 2 query
       smiling twenty-something girl in front of a blue background -->
   <x-default-action>
   if (obj('sarah').position == 'coffee-shop') {
       game.moveObject('sarah', 'office');
   } else {
       game.moveObject('sarah', 'coffee-shop');
   }
   </x-default-action>
</x-object>
<x-location id="office">
    <x-present>
    <h1>Office</h1>
    </x-present>
    <x-present ck="obj('sarah').position == 'office'">
    <x-speaker name="sarah" expression="Surprised">I didn't
    expect you to be in on the weekend!</x-speaker>
    </x-present>
    <x-present>
    <div>
    <x-button href="#office">Stay Here</x-button>
    <x-button href="#coffee-shop">Go to the Coffee Shop</x-button>
    </div>
    </x-present>
</x-location>
<x-location id="coffee-shop">
    <x-present>
    <h1>Coffee Shop</h1>
    </x-present>
    <x-present ck="obj('sarah').position == 'coffee-shop'">
    <x-speaker name="sarah" >Oh, hey. Long time no see!</x-speaker>
    </x-present>
    <x-present>
    <x-button href="#coffee-shop">Stay Here</x-button>
    <x-button href="#office">Go to the Office</x-button>
    </x-present>
</x-location>
</x-game>
<script src="frise/js/game.js" ></script>
</body>
</html>
The above code can be found in the FRISE Download or Viewed Online. This game has two object, the main-character and sarah, and it has two locations, an office and a coffee-shop. The game starts with the main-character and sarah at the office. Before this location draws itself though, sarah 's default action runs. The code for the default-action is:
if (obj('sarah').position == 'coffee-shop') {
   game.moveObject('sarah', 'office');
} else {
   game.moveObject('sarah', 'coffee-shop');
}
we have seen if statements before, but this is our first example of an if-else statement. The first part of the if-else statement checks if sarah is at the coffee-shop. If this is the case, then the moveObject member function of the game object is executed with the arguments sarah and office. This member function changes the location of an game object (sarah, in this case) to a target location (office). In an if-else statement, if the theif condition fails then the else block is executed. The else block moves sarah to the coffee-shop. As sarah 's initial position when the game begins is the office, this default action will move sarah to the coffee-shop before anything is drawn. Each turn thereafter, sarah will alternate between the office and the coffee-shop. At each of the locations there are two x-button 's: "Stay Here" and "Go to the_other_location" (where the_other_location is either the Office or teh Coffee Shop depending on where you are). These links take you to where you'd expect. Each of the two locations has a condition x=present element for the case when sarah is at that location. If both the main-character and sarah are at the office, then a speaker element with sarah saying, "I didn't expect you to be in on the weekend!" is shown. If both the main-character and sarah are at the coffee-shop, then a x-speaker element with sarah saying, "Oh, hey. Long time no see!" is shown. This pretty much completes the description of this game except to note that is also uses one feature of the x-speaker element we haven't seen before, the expression attribute. If present, this attribute will but next to the speaker's name in bold-face, the contents of this attribute.
Presentations with Form Elements
As we mentioned in the Choose Your Own Scenery section, interactive fiction is often written from the second person perspective (You do this... You do that...). To enhance the immersive aspect of this, it is useful to allow the player to do character customizations. This requires getting inputs from the player beyond just the links they click. Luckily, HTML comes with a set of tags for collecting using inputs on web forms. FRISE let's you use most of these elements to collect information. Below is a short game to illustrate how this works.
<!doctype html>
<html lang="en">
<head>
    <title>A FRISE Game with Form Element</title>
    <meta charset="UTF-8" >
    <link rel="stylesheet" href="frise/css/game.css" >
</head>
<body>
<x-game>
<x-object id="main-character">
   <x-name>You</x-name>
   <x-real-name>Frise Guy</x-real-name>
   <x-age>30</x-age>
   <x-handedness>right</x-handedness>
   <x-issue>I have a toothache.</x-issue>
   <x-position>examination-room</x-position>
   <x-icon>images/frise_guy.webp</x-icon>
</x-object>
<x-object id="doctor">
   <x-name>Doctor</x-name>
   <x-position>examination-room</x-position>
   <x-icon>images/doctor.webp</x-icon>
   <!--Doctors's icon was the Dall-E 2 query
       serious looking black doctor with a green background -->
</x-object>
<x-location id="examination-room">
    <x-present>
    <h1>Examination Room</h1>
    <x-speaker name="doctor">Before we do an examination, let's begin
    with some intake questions...</x-speaker>
    <x-speaker name="doctor">What is
        <label for="mc-name">your name</label>?</x-speaker>
    <x-speaker name="main-character">I am <input id="mc-name"
        data-for="main-character" name="real-name">.</x-speaker>
    <x-speaker name="doctor">How <label for="mc-old">old</label> are you?
    </x-speaker>
    <x-speaker name="main-character">
    <select id="mc-old" data-for="main-character" name="age">
    <option value="20">20</option>
    <option value="30">30</option>
    <option value="40">40</option>
    <option value="50">50</option>
    <option value="60">60</option>
    </select>
    </x-speaker>
    <x-speaker name="doctor">Which is your dominant hand?
    </x-speaker>
    <x-speaker name="main-character">
    <input type="radio" id="left-hand" data-for="main-character"
       name="handedness" value="left">
    <label for="left-hand">Left Hand</label>
    <input type="radio" id="right-hand" data-for="main-character"
       name="handedness" value="right">
    <label for="right-hand">Right Hand</label><br>
    </x-speaker>
    <x-speaker name="doctor">What
        <label for="mc-issue">issue</label> brings you in today?
    </x-speaker>
    <x-speaker name="main-character">
    <textarea id="mc-issue" data-for="main-character" name="issue">
    </textarea>
    </x-speaker>
    <x-speaker name="doctor">
        <a href="#summary">Okay, let me summarize...</a></x-speaker>
    </x-present>
</x-location>
<x-location id="summary">
    <x-present>
    <x-speaker name="doctor">
    <p>Your name is ${obj('main-character')['real-name']}.</p>
    <p>You are ${obj('main-character').age} years old.</p>
    <p>You are ${obj('main-character').handedness} handed.</p>
    <p>You came here because ${obj('main-character').issue}</p>
    <p>Is that correct?</p>
    </x-speaker>
    <x-speaker name="main-character">
    <a href="#examination-room">I think we should go over it again.</a>
    </x-speaker>
   </x-present>
</x-location>
</x-game>
<script src="frise/js/game.js" ></script>
</body>
</html>
The above code can be found in the FRISE Download or Viewed Online. The game consists of two objects: the main-character and a doctor, and two locations: an examination-room and a summary location. The main-character starts in the examination room. The present element in the examination-room is a conversation between the main-character and the doctor where the doctor asks some intake questions and the main-character gives responses which can be changed by the user altering their initial values. There is a "Let me summarize" link at the end of this present element that takes one to a summary location. Here the potentially modified values of main-character 's responses are presented. The code for the examination-room location illustrates the following common HTML elements for receiving user input:
- input : this element by default is drawn as a single line text field. Its type attribute though can be used to make it look like a variety of different input controls. The values for type that FRISE supports are: text, for the default text field; range, for a slider to select a value in a range; radio for radio buttons; color, to choose a color; date, to choose a date; email, to input an email; number, to choose a number; tel, to input a telephone number; time, to choose a time; and url, to choose a url.
- textarea : this element is for multi-line text input. Its size and shape can be controlled by setting its width and height properties using CSS.
- select : this element is used to draw a dropdown control. The different possibilities for this dropdown are determined by the option elements it contains.
The example game above illustrates a default input element, a radio input element, a textarea, and a select dropdown. To say what object or location a given input, textarea, or select element's values should be bound to, FRISE uses the data-for attribute. Recall for any HTML element, any attribute that begins with data- is considered a user-defined attribute and is always considered valid. To say what property of that object or location to bind to we use the name attribute of the input, textarea, or select element. So, for example, the values in the text field given by:
<input id="mc-name" data-for="main-character" name="real-name">
will initially come from the value of obj('main-character')["real-name"], and if the user makes any change to the text field, the new value is written back to obj('main-character')["real-name"]. Here we are using the alternative syntax some_object['some_property'] to refer to a property of an object rather than some_object.some_property, because the property real-name contains a hyphen, so Javascript will confuse it for a minus sign if you use the latter syntax.
When working with user input fields, for accessibility reasons, you should attach a label to the field saying what kind of value is expected for that input. In HTML, this is done with the label element. For example,
<label for="mc-name">your name</label>
says that the user input field with id="mc-name" should be given a value corresponding to your name.
Navigation Bars
A navigation bar is a common collection of information, controls, and links always visible, or at least quickly accessible, from every location in a FRISE game. The image below shows a FRISE game with a navigation bar:
The controls at the top of the navigation bar are present by default. The hamburger menu button is used to expand or collapse the navigation bar, the arrow buttons are used to go forward/backward through the game history. In FRISE, navigation bars are created by having a x-main-nav element within the x-game element. This is illustrated by the following FRISE story:
<!doctype html>
<html lang="en">
<head>
<title>A FRISE Game With a Nav Bar</title>
<meta charset="UTF-8" >
<link rel="stylesheet" href="frise/css/game.css" >
</head>
<body>
<x-game>
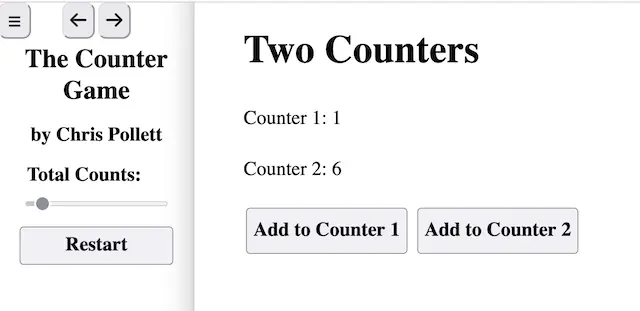
<x-main-nav>
<h1>The Counter Game</h1>
<h2>by Chris Pollett</h2>
<div class="left nav-label">
<b><label for="start-total">Total Counts</label>:</b></div>
<div><input id="start-total" type="range" name="total"
data-for="start" min="0" max="100" disabled></div>
<div><x-button href="#reset;start">Restart</x-button></div>
<x-action id="reset">
game.reset();
</x-action>
</x-main-nav>
<x-object id="main-character">
<x-position>start</x-position>
</x-object>
<x-location id="start">
<x-counter1>0</x-counter1>
<x-counter2>0</x-counter2>
<x-total>0</x-total>
<x-present>
<h1>Two Counters</h1>
<p>Counter 1: ${loc('start').counter1}</p>
<p>Counter 2: ${loc('start').counter2}</p>
<p>
<x-button href="#addcount(1);start">Add to Counter 1</x-button>
<x-button href="#addcount(2);start">Add to Counter 2</x-button>
</p>
<x-action id="addcount">
let counter = "counter" + args[0];
let counter_value = parseInt(loc("start")[counter]);
let total_value = parseInt(loc("start").total);
counter_value++;
total_value++;
loc("start")[counter] = counter_value;
loc("start").total = total_value;
</x-action>
</x-present>
</x-location>
</x-game>
<script src="frise/js/game.js" ></script>
</body>
</html>
The above code can be found in the FRISE Download or Viewed Online. This story consists of a single object, main-character positioned at a single location, start. The start location's present element outputs the values of the two start location properties counter1 and counter2, both initially 0, and outputs two x-buttons, which link to respectively #addcount(1);start and #addcount(2);start that can be used to add to these counters. The code for addcount first stores in a temporary variable, counter, the result of concatenating the string 'counter' with the argument that was supplied (either 1 or 2 in this case), it then looks up that property (either counter1 or counter2) of the start location and converts it from a string to an integer, adds one to it, and stores it back in this property. It also add 1 to the total_count property of the start location.
This game has a navigation bar which is defined in the main-nav element. As exhibited by the game code, within this element we can put standard HTML tags, and they will show in the navigation bar. Since the navigation bar is relatively narrow, one should be judicious in the choice of elements used and their width. The particular HTML for this game's navigation bar, uses an h1 and h2 element to show respectively the title of the game and the author. It then displays the current value of the total_count property of the start location using a range input element. This element has a disabled attribute to prevent a user from directly manipulating its value. Finally, it has a Restart x-button with link #reset;start, the reset activity calling game.reset() that was discussed in an earlier example.
Making a Save Screen
Being able to save and load the current game state is an important feature that a story engine can provide. The FRISE game object has member functions to facilitate loading and saving games from either a file, or a modern browser's sessionStorage object. The actual HTML code, buttons, etc., for presenting to the user save/load options is left though to the game developer. Below we give an example game which uses a saves location with an HTML table in its present element to display current sessionStorage game saves, and then beneath this to give links to save to and load from disk. In the code downloads, we actually give two versions of this story, the one below which is slightly longer, but uses less Javascript, and a shorter one using Javascript for loops.
<!doctype html>
<html lang="en">
<head>
<title>A FRISE Game With a Save Screen</title>
<meta charset="UTF-8" >
<link rel="stylesheet" href="frise/css/game.css" >
</head>
<body>
<x-game>
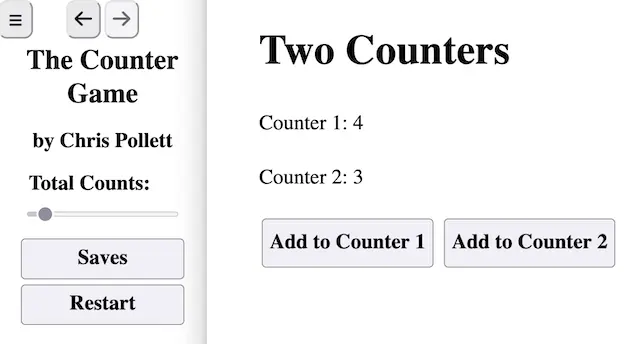
<x-main-nav>
<h1>The Counter Game</h1>
<h2>by Chris Pollett</h2>
<div class="left nav-label">
<b><label for="start-total">Total Counts</label>:</b></div>
<div><input id="start-total" type="range" name="total"
data-for="start" min="0" max="100" disabled></div>
<div><x-button href="#saves">Saves</x-button></div>
<div><x-button href="#reset;start">Restart</x-button></div>
<x-action id="reset">
game.reset();
</x-action>
</x-main-nav>
<x-object id="main-character">
<x-position>start</x-position>
</x-object>
<x-location id="start">
<x-counter1>0</x-counter1>
<x-counter2>0</x-counter2>
<x-total>0</x-total>
<x-present>
<h1>Two Counters</h1>
<p>Counter 1: ${loc('start').counter1}</p>
<p>Counter 2: ${loc('start').counter2}</p>
<p>
<x-button href="#addcount(1);start">Add to Counter 1</x-button>
<x-button href="#addcount(2);start">Add to Counter 2</x-button>
</p>
<x-action id="addcount">
let counter = "counter" + args[0];
let counter_value = parseInt(loc("start")[counter]);
let total_value = parseInt(loc("start").total);
counter_value++;
total_value++;
loc("start")[counter] = counter_value;
loc("start").total = total_value;
</x-action>
</x-present>
</x-location>
<x-location id="saves" >
<x-save-rows></x-save-rows>
<x-present>
<table class="save-table">
<tr><th colspan="4">Saves
<x-button class="float-opposite" href="#previous">X</x-button>
</th></tr>
${loc('saves')['save-rows']}
<tr><td colspan="2">
<x-button
href="#save-disk;previous">Save to Disk</x-button></td>
<td><x-button
href="#load-disk;exit">Load from Disk</x-button></td>
<td><x-button
href="#delete-slot-all;exit">Delete All</x-button></td></tr>
</table>
</x-present>
<x-location id="saves" >
<x-slot1>Save</x-slot1>
<x-filename1>...</x-filename1>
<x-filled1>not-filled</x-filled1>
<x-delete1>disabled</x-delete1>
<x-slot2>Save</x-slot2>
<x-filled2>not-filled</x-filled2>
<x-delete2>disabled</x-delete2>
<x-filename2>...</x-filename2>
<x-slot3>Save</x-slot3>
<x-filename3>...</x-filename3>
<x-filled3>not-filled</x-filled3>
<x-delete3>disabled</x-delete3>
<x-slot4>Save</x-slot4>
<x-filename4>...</x-filename4>
<x-filled4>not-filled</x-filled4>
<x-delete4>disabled</x-delete4>
<x-slot5>Save</x-slot5>
<x-filename5>...</x-filename5>
<x-filled5>not-filled</x-filled5>
<x-delete5>disabled</x-delete5>
<x-present>
<table class="save-table">
<tr><th colspan="4">Saves
<x-button class="float-right" href="#previous">X</x-button>
</th></tr>
<tr><th>1.</th>
<td><x-button class="${loc('saves').filled1}"
href="#slot(1);exit">${loc('saves').slot1}</x-button></td>
<td id="slot1" class="save-name">${loc('saves').filename1}</td>
<td><x-button class="${loc('saves').delete1}"
href="#delete-slot(1);exit" >Delete</x-button></td>
</tr>
<tr><th>2.</th>
<td><x-button class="${loc('saves').filled2}"
href="#slot(2);exit">${loc('saves').slot2}</x-button></td>
<td id="slot2">${loc('saves').filename2}</td>
<td><x-button class="${loc('saves').delete3}"
href="#delete-slot(2);exit">Delete</x-button></td>
</tr>
<tr><th>3.</th>
<td><x-button class="${loc('saves').filled3}"
href="#slot(3);exit">${loc('saves').slot3}</x-button></td>
<td id="slot3">${loc('saves').filename3}</td>
<td><x-button class="${loc('saves').delete3}"
href="#delete-slot(3);exit">Delete</x-button></td>
</tr>
<tr><th>4.</th>
<td><x-button class="${loc('saves').filled4}"
href="#slot(4);exit">${loc('saves').slot4}</x-button></td>
<td id="slot4">${loc('saves').filename4}</td>
<td><x-button class="${loc('saves').delete4}"
href="#delete-slot(4);exit">Delete</x-button></td>
</tr>
<tr><th>5.</th>
<td><x-button class="${loc('saves').filled5}"
href="#slot(5);exit">${loc('saves').slot5}</x-button></td>
<td id="slot5">${loc('saves').filename5}</td>
<td><x-button class="${loc('saves').delete5}"
href="#delete-slot(5);exit">Delete</x-button></td>
</tr>
<tr><td colspan="2">
<x-button
href="#save-disk;previous">Save to Disk</x-button></td>
<td><x-button
href="#load-disk;exit">Load From Disk</x-button></td>
<td><x-button
href="#delete-slot-all;exit">Delete All</x-button></td></tr>
</table>
</x-present>
<x-default-action>
if (obj('main-character').position == 'saves') {
game.initSlotStates();
}
</x-default-action>
<x-action id="slot">
if (args[0]) {
game.saveLoadSlot(args[0]);
}
</x-action>
<x-action id="delete-slot">
if (args[0]) {
game.deleteSlot(args[0]);
}
</x-action>
<x-action id="delete-slot-all">
game.deleteSlotAll();
</x-action>
<x-action id="save-disk">
game.save();
</x-action>
<x-action id="load-disk">
game.load();
</x-action>
</x-location>
</x-game>
<script src="frise/js/game.js" ></script>
</body>
</html>
The above code can be found in the FRISE Download or Viewed Online. This story is mainly the same as the navigation bar example story. The game content area displays two counters and beneath this there are two buttons which allow one to increase their respective counts:
Unlike that game which only had a start location, this game also has a saves location which is linked to in the navigation bar.
The saves location code first defines five blocks of four properties: saves1, filled1, filename1, delete1, ..., saves5, filled5, filename5, delete5. These blocks each correspond to a storage place for one game save in sessionStorage Here sessionStorage is a part of a browser's memory where a web site can store key-value pairs which will persist until the tab the web-site was loaded in is closed. FRISE uses the pair "slot" + game.id + slot_number (where + is concatenation) as the key, and a string representation of a game state as the value, when saving a game to sessionStorage. So in saves location's property blocks, the first group corresponds to data for slot_number with value 1, the second for slot_number 2, etc. The code at the start of saves location gives values for each slot under the assumption that no games have yet been saved. If the main-character is at the saves location, then the default-action for the saves location executes the code game.initSlotStates(); The initSlotStates() member function of game searches for all keys of the form "slot" + game.id + slot_number in sessionStorage and then adjusts the values of the saves locations saves + slot_number, filled + slot_number, filename + slot_number, delete + slot_number properties according to the game saved at that key. This code finds all such keys even if there were more than five slots, so the saves screen can be customized in more ways than the example given above. The value of saves + slot_number is "Save" if the slot is empty (so you can store a game), and "Load" if the slot has a game stored in it (so you can load that game). The value of filled + slot_number is either "filled" or "not-filled" according to if a game is stored in a slot. The filled + slot_number is used to style buttons to load games with background color blue and to style buttons to save games using background color white. filename + slot_number is the time at which the game was saved if the slot is used, and is otherwise, "..." The value of delete + slot_number is used to style the delete button for a game slot. If there is no game save, then its value is disabled so the the delete button will be disabled; otherwise, it is empty.
To present the state of the game save slots, the example above uses an HTML table element. An HTML table element typically consists of a sequence of tr elements, each used to specify one table row. A tr element in turn typically consists of a sequence of th and td elements, where a th elements is used for a table heading, and a td element contains one table data item. The table above has a class attribute save-table. This is used by frise/css/game.css to style the width, border, text-alignment, etc. properties of how the table should be drawn. The first row of the table has a button with an X on it, which when clicked goes to #previous. The #previous url is a special FRISE url which always goes back to the previous game state in the game history. The only td element in the first row uses a colspan="4" attribute to say that it should be four columns wide. The next five rows of this table each present information about one game save slot. Each uses the corresponding property block of the saves location discussed in the previous paragraph. In a given row, the Save/Load button links to #slot(slot_number);exit. Here the slot action calls game.saveLoadSlot(args[0]); to either save the current game to the clicked slot, if no game is in the slot; or load the game data that is currently in the slot, if game data is in the slot. exit is a special FRISE command which stays in the current location for the game turn, but does not add to the game history. The Delete button in a given row links to #delete-slot(slot_number);exit. Here the delete-slot action calls game.deleteSlot(args[0]) to delete any game data in the slot_number slot if present. The last row of the save table has three buttons Save to Disk, whose action calls game.save() to make launch a file menu for saving the current game state to disk, Load to Disk, whose action calls game.load() to launch a file menu for loading the current game state from disk, and Delete All, whose action calls game.deleteSlotAll() to delete all session data stored in any game save slots.
Making an Inventory System
In many interactive stories, it is common for the main character to pick up items and use them as the game progresses. To remember what items the character currently has, there is usually an Inventory button which takes one to a location that displays the character's belongings. The example below shows how such an inventory location can be made in a FRISE game. It also illustrates how we could have written the saves location of the previous FRISE example using Javascript for loops.
<!doctype html>
<html lang="en">
<head>
    <title>A FRISE Game With an Inventory</title>
    <meta charset="UTF-8" >
    <link rel="stylesheet" href="frise/css/game.css" >
</head>
<body>
<x-game>
<x-main-nav>
    <h1>Pick Up Stuff Game</h1>
    <h2>by Chris Pollett</h2>
    <div><x-button href="#inventory">Inventory</x-button></div>
    <div><x-button href="#saves">Saves</x-button></div>
    <div><x-button href="#reset;room-a">Restart</x-button></div>
    <x-action id="reset">
        game.reset();
    </x-action>
</x-main-nav>
<x-object id="main-character">
   <x-position>room-a</x-position>
</x-object>
<x-object id="keys">
    <x-name>Keys</x-name>
    <x-carryable>true</x-carryable>
    <x-position>room-a</x-position>
</x-object>
<x-object id="wallet">
    <x-name>Wallet</x-name>
    <x-carryable>true</x-carryable>
    <x-position>room-b</x-position>
</x-object>
<x-location id="room-a">
    <x-present>
    <h1>Room A</h1>
    <p>You can:</p>
    <ul>
    ${loc('room-a')['pickup-list']}
    <li><a href="#room-b">Go to Room B</a></li>
    </ul>
    </x-present>
    <script type="text/default-action">
    if (obj('main-character').position == "room-a") {
        loc('room-a')['pickup-list'] = getPickUpList("room-a");
    }
    </script>
</x-location>
<x-location id="room-b">
    <x-present>
    <h1>Room B</h1>
    <p>You can:</p>
    <ul>
    ${loc('room-b')['pickup-list']}
    <li><a href="#room-a">Go to Room A</a></li>
    </ul>
    </x-present>
    <script type="text/default-action">
    if (obj('main-character').position == "room-b") {
        loc('room-b')['pickup-list'] = getPickUpList("room-b");
    }
    </script>
</x-location>
<x-location id="inventory">
    <x-present>
    <h1>Inventory</h1>
    <div>You are carrying the following items:</div>
    ${getInventoryList()}
    <div><x-button href="#${obj('main-character').old_position}"
        >Return</x-button></div>
    </x-present>
</x-location>
<x-location id="saves" >
    <script type="text/default-action">
    if (obj('main-character').position == 'saves') {
        let num_slots = 5;
        let save_loc = loc('saves');
        for (let i = 0; i < num_slots; i++) {
            if (typeof save_loc['filled' + i] == 'undefined') {
                save_loc['filled' + i] = "";
                save_loc['slot' + i] = "";
                save_loc['filename' + i] = "";
                save_loc['delete' + i] = "";
            }
        }
        game.initSlotStates();
        save_loc.present = [];
        let save_table = `
           <table class="save-table">
               <tr><th colspan="4">Saves
                 <x-button class="float-opposite" href="#previous">X</x-button>
           </th></tr>`;
        for (let i = 0; i < num_slots; i++) {
            let filled = save_loc['filled' + i];
            let slot = save_loc['slot' + i];
            let filename = save_loc['filename' + i];
            let delete_text = save_loc['delete' + i];
            save_table += `
            <tr><th>${i}</th>
                <td><x-button class="${filled}"
                    href="#slot(${i});exit">${slot}</x-button></td>
                <td id="slot${i}" class="save-name">${filename}</td>
                <td><x-button class="${delete_text}"
                    href="#delete-slot(${i});exit" >Delete</x-button></td>
            </tr>`;
        }
        save_table += `
           <tr><td colspan="2">
               <x-button
                   href="#save-disk;previous">Save to Disk</x-button></td>
               <td><x-button
                   href="#load-disk;exit">Load from Disk</x-button></td>
               <td><x-button
                   href="#delete-slot-all;exit">Delete All</x-button></td></tr>
         </table>`;
         save_loc.present.push([null, "", false, save_table]);
    }
    </script>
    <x-action id="slot">
    if (args[0]) {
        game.saveLoadSlot(args[0]);
    }
    </x-action>
    <x-action id="delete-slot">
    if (args[0]) {
        game.deleteSlot(args[0]);
    }
    </x-action>
    <x-action id="delete-slot-all">
        game.deleteSlotAll();
    </x-action>
    <x-action id="save-disk">
        game.save();
    </x-action>
    <x-action id="load-disk">
        game.load();
    </x-action>
</x-location>
<x-action id="pickup">
    let object_id = args[0];
    game.moveObject(object_id, 'inventory');
</x-action>
<x-action id="drop">
    let object_id = args[0];
    //if at inventory location old position is where click on inventory from
    let position = obj('main-character').old_position;
    game.moveObject(object_id, position);
</x-action>
</x-game>
<script src="frise/js/game.js" ></script>
<script>
function getPickUpList(location_id)
{
    let list = "";
    let items = loc(location_id).items;
    for (const item_id of items) {
        let item = obj(item_id);
        if (item.hasOwnProperty("carryable")) {
            list += `<li><a href="#pickup(${item_id});${location_id}">` +
                `Pick up ${item.name}</a></li>`;
        }
    }
    return list;
}
function getInventoryList()
{
    let list = "";
    let items = loc("inventory").items;
    for (const item_id of items) {
        let item = obj(item_id);
        if (item.hasOwnProperty("carryable")) {
            list += `<li>${item.name} [<a href="#drop(${item_id});exit">` +
                `Drop</a>]</li>`;
        }
    }
    if (list != "") {
        list = "<ul>" + list + "</ul>";
    }
    return list;
}
</script>
</body>
</html>
The above code can be found in the FRISE Download or Viewed Online. This game has three objects, the main-character, keys, and wallet; and it has four locations, room-a, room-b, saves, and inventory. The saves location looks the same as the previous example game. The other three rooms look like (depending on what has been picked up):
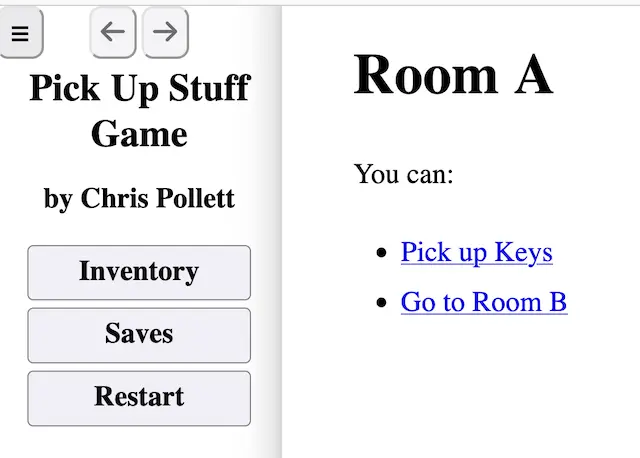
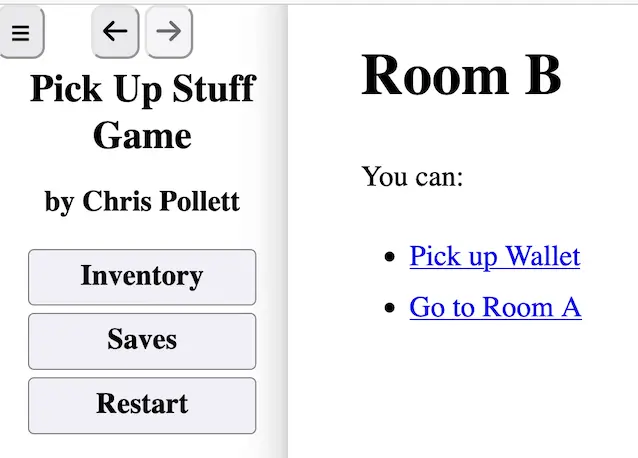
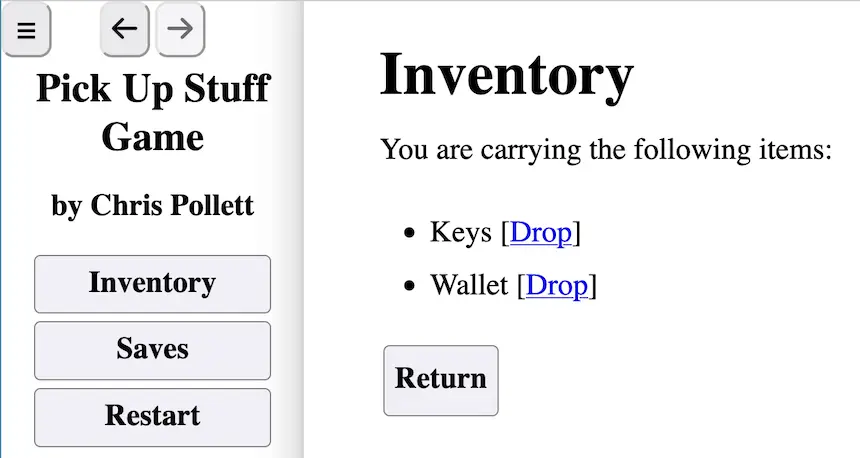
The main-character starts in room-a, the keys start in room-a, and the wallet starts in room-b. Each room has a link to the other room as well as links to pick up any non-main-character objects that happen to be in the room. If an object is picked up, it is moved to the inventory location. Clicking the Inventory button in the navigation bar takes one to the inventory location where one can see the objects currently in the inventory. The inventory location has links next to each object allowing that object to be dropped into the room the main-character had been in before going to the inventory location. The inventory location also has a button to return to the previous location.
Let's now examine the code to implement the above functionality. First, because the action's and default-action's involve < and > symbols, the alternative syntax for these tags we mentioned in the Actions and Default Actions section is being used, namely,
<script type="text/action">...</script>
rather than
<x-action>...</x-action>
and
<script type="text/default-action">...</script>
rather than
<x-default-action>...</x-default-action>
Next, let's look at how the saves location code has changed from the code in the Making a Save Screen section. In this version, the HTML code doesn't have any <x-slot1>...<x-filename1>,... etc tags and it doesn't have any x-present element. Instead, the saves location default action first creates the slot + slot_number, filename + slot_number, then it calls game.initSlotStates() (as before), and finally, it dynamically creates the present data for the location. To do the first and last of these, it makes use of Javascript for loops. A for loop is a way to tell Javascript to repeat an action a certain number of times. A traditional for has the format:
for (initial_values_of_loop_variables;
     condition_to_stop_repeating;
     how_to_change_variables_each_iteration) {
     code_to_execute_multiple_times
}
So in the code above, the first for loop runs five times and creates the slot properties in saves location with empty values. The code after game.initSlotStates(), creates a string save_table with the HTML code for the save table from the earlier Save Game example. The string with the HTML for the first table row with the close button is just directly stored in save_table. The next five rows are created using a for loop to create and concatenate each slot's information a single row at a time. Finally, the Save to Disk, Load from Disk, and Delete all Slots row is concatenated. Once a string has been made for the HTML save table, we need to tell FRISE to use it as part of the presentation of the saves location. Internally, in FRISE, the contents of a location's x-present tags are represented as a property present of that location. This property is an array (a numbered sequence) of triples (check_condition, staging, contents), each triple representing one x-present. So to make a new present item for FRISE to display at the saves location, we push one more triple to the end of the array with the line:
save_loc.present.push([null, "", save_table]);
The actions linked to from the saves location are exactly as in the previous example.
The code for the two room locations is essentially the same, execpt that in wherever Room A uses 'a' or 'A', Room B uses 'b' or 'B'; and wherever Room A uses 'b' or 'B', Room B uses 'a' or 'A'. So we will only discuss the code for Room A. The room-a location has a single x-present element. The only dynamic item on it is:
 <ul>
 ${loc('room-a')['pickup-list']}
 <li><a href="#room-b">Go to Room B</a></li>
 </ul>
the code ${loc('room-a')['pickup-list']} adds additional list items for things that can be picked up at this location. loc('room-a')['pickup-list'] is created by the default action of the room's location:
if (obj('main-character').position == "room-a") {
   loc('room-a')['pickup-list'] = getPickUpList("room-a");
}
Here getPickUpList is a Javascript function that is defined in <script> tags at the end of the example code:
function getPickUpList(location_id)
{
    let list = "";
    let items = loc(location_id).items;
    for (const item_id of items) {
        let item = obj(item_id);
        if (item.hasOwnProperty("carryable")) {
            list += `<li><a href="#pickup(${item_id});${location_id}">` +
                `Pick up ${item.name}</a></li>`;
        }
    }
    return list;
}
This function takes a single argument location_id (the name of a location). It then builds up a string containing the HTML to draw list items which can be picked up. To do this, it first makes a temporary variable items by looking up the game location object corresponding to location_id, getting its items property, and storing it in items. As we have mentioned before, the items property of a location is an array of all the names of game objects at that location. To cycle through these items, we use a for...of loop, this cycles through the array and does the same action, once per element of the array. In this case, for each name of an object at the location, we get the corresponding object, and store it in item. Then we check whether item has the carryable property, if it does, we concatenate onto the string list HTML code for a list item containing a link to pick up item. Notice in the example code, the objects keys and wallet each have <x-carryable>true</x-carryable>, but main-character does not, so even though main-character might be in a location, it will not have a list item to pick it up. The function getPickUpList returns the list that it makes (the line return list;). So the code:
''loc('room-a')['pickup-list'] = getPickUpList("room-a");''
would get the list made for room-a and would store it in the pickup-list property of room-a.
The code for a url to pick up an item has the format: #pickup(${item_id});${location_id}. So if the current room was room-a and the item was keys, this would look like #pickup(keys);room-a. This would cause FRISE to call the action pickup with args[0] set to keys. After the action was done, it would set the main-character 's location to room-a. The code in the pickup action is:
let object_id = args[0];
game.moveObject(object_id, 'inventory');
Here game.moveObject(object_id, location_id) is a member function of game that removes a game object with name object_id from its current location's items array and adds it to the items array of the location with name location_id (hence, moving the location of the object). So in this case, the item to be picked-up (keys, in our example) would be moved to the inventory location.
This completes the description for how the code for the two rooms works. We are, lastly, left with describing how the code for the inventory location works. The inventory location only has one x-present element which contains:
<h1>Inventory</h1>
<div>You are carrying the following items:</div>
 ${getInventoryList()}
 <div><x-button href="#${obj('main-character').old_position}"
  >Return</x-button></div>
The code ${getInventoryList()} executes the Javascript function getInventoryList() defined in <script> tags at the end of the code example to get a string of HTML with the items currently in the inventory location and with links next to each to allow the user to drop that item. After this list, there is a Return button with location #${obj('main-character').old_position}. Each game object in FRISE has an old_position property which is the last location the item was that wasn't the saves location. Using the main-character's old_position for Return is different than using #previous because the latter pops an element off the game history, the former adds an element to the game history -- even if both move the main-character to the same location. This is important because if we drop an item, we don't want to back up the history and immediately undrop it.
The code in getInventoryList is:
function getInventoryList()
{
    let list = "";
    let items = loc("inventory").items;
    for (const item_id of items) {
        let item = obj(item_id);
        if (item.hasOwnProperty("carryable")) {
            list += `<li>${item.name} [<a href="#drop(${item_id});exit">` +
                `Drop</a>]</li>`;
        }
    }
    if (list != "") {
        list = "<ul>" + list + "</ul>";
    }
    return list;
}
This is very similar to the code in getPickUpList. The two main differences are that the above code is always for a single location (inventory) rather than a location given by an argument location_id and that the link url in the above code used in the list items is now #drop(${item_id});exit. So if wallet was in the inventory, there would be a link to #drop(wallet);exit to drop it. Clicking this link would execute the code in the drop action with args[0] = 'wallet' . As we have said before, exit is a special FRISE command which stays in the current location for the game turn, but does not add to the game history. The code for the drop action is:
let object_id = args[0];
//if at inventory location old position is where click on inventory from
let position = obj('main-character').old_position;
game.moveObject(object_id, position);
This moves the given game object from the inventory to the last location that wasn't the saves location that the main-character was at before it went to the inventory. This complete the description of the game with an inventory example.
Writing a FRISE story in a Language Other Than English
If you want to write a FRISE story in a language other than English, there are only a few things you need to change (except the use of the language itself). First, the open html tag at the start of your story should be switched from <html lang="en"> to <html lang="IETF_Language_Tag_You_Want">. Wikipedia contains a list of IETF Language Tags and the language they correspond to. If you are using FRISE's save system, then there are a small number of strings that are actually output by the FRISE script in English. To change them to your desired language, you should replace the script include line
<script src="frise/js/game.js" ></script>
with:
<script src="frise/js/game.js" ></script>
<script>
locale = "IETF_Language_Tag_You_Want";
tl[locale] = {
    "init_slot_states_load" : "Load", //translate "Load" to your language
    "init_slot_states_save" : "Save", //translate "Save" to your language
    "restore_state_invalid_game" : "Does not appear to be a valid game save"
         //translate "Does not appear to be a valid game save" to your language
};
</script>
If the language you want to write in is a right-to-left language, and you are using a main-nav element, then add to the end of the script element above:
is_right_to_left = true;
Example 9C in the FRISE Download shows the result of translating our save game example to Arabic.
Useful Abbreviations and Fields
FRISE contains a helper functions which can save on typing and make your story/game more succinct. In this section, we briefly describe them.
- baseLoc() - this function always refers to the Location object that the main-character begins the game at. It can be useful to store global properties of your story/game at this location, then use this function to quickly access them.
- mc() - this function is an abbreviation for obj('main-character'). Since the main character is often referred to when writing the Javascript portions of your game, this function saves a lot on typing.
- here() - this function is an abbreviation for loc(mc().position), the Location object that the main character is currently at.
- isHere() - this method only returns true in a default action of the Location the main character is currently at; otherwise, it returns false. Default actions run once per game turn for all objects and locations. This allows for interesting game aspects like more dynamic non-playing characters. On the other hand, some times we want the default action of a location to only execute if the main character is there. This can be achieved using isHere() and code like:
<script type="text/default-action">
if (isHere()) {
    //do something
}
</script>
- some_location.visited - if some_location is a Location object, then visited will contain a count of how many turns the main character has spent at that location. So if the main character has never been to that location, this count will be 0.
Text Effects Built-in to FRISE
In interactive fiction it is common to use different text styles to set the mood of a scene. In traditional media writing one might use bold-face to indicate important information or italics for emphasis. In interactive fiction, one might indicate loss of vision or drunkenness using blurry text or demonic text using mirrored writing. Blurred text might become unblurred while a key or finger press is held to reveal a spoiler hint. As text can be animated on the web, one can also have shuddering or rumbling text. One might indicate the composition of a diary by have the text type itself on the screen. Many of these effect are easily done in HTML using cascading stylesheets (CSS), however, it is handy to have a collection of useful CSS classes and extra FRISE tags to abbreviate the necessary CSS. In this section, we show some of the built-in text effects FRISE supports. We also cover some transition effects one can do between FRISE Locations as well as how to style locations to get a background image for a scene as described in Graphics in Interactive Fiction.
The game we will discuss is Example 11 in the FRISE Download. It consists of two locations whose screenshots we show below.
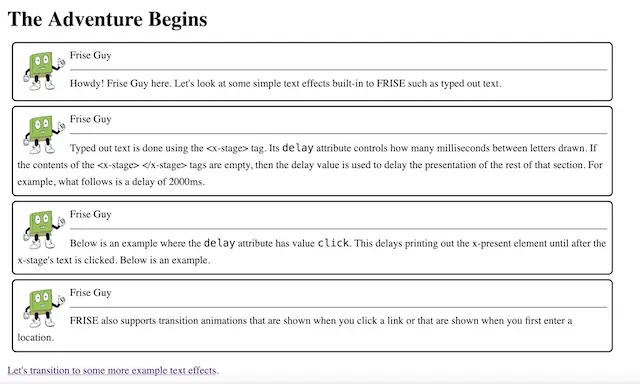
The source code for Example 11 is:
<!doctype html>
<html lang="en">
<head>
  <title>A Text Effects Game</title>
  <meta charset="UTF-8" >
  <link rel="stylesheet" href="frise/css/game.css" >
  <!--You could link your own/other stylesheets here-->
</head>
<body>
<x-game>
<x-object id="main-character">
  <x-position>start</x-position>
  <x-name>Frise Guy</x-name>
  <x-icon>images/frise_guy.webp</x-icon>
</x-object>
<x-location id="start">
   <x-present>
   <h1>The Adventure Begins</h1>
   <x-speaker name="main-character">
       <x-stage>
       Howdy! Frise Guy here. Let's look at some simple text effects
       built-in to FRISE such as typed out text.
       </x-stage>
   </x-speaker>
   <x-speaker name="main-character">
       Typed out text is done using the <x-stage> tag. Its <tt>delay</tt>
       attribute controls how many milliseconds between
       letters drawn. If the contents of the <x-stage> </x-stage>
       tags are empty, then the delay value is used to delay the presentation
       of the rest of that section. For example, what follows is a delay of
       2000ms.
   </x-speaker>
   <x-stage delay="2000"></x-stage>
   <x-speaker name="main-character">
       Below is an example where the <tt>delay</tt>
       attribute has value <tt>click</tt>.
       This delays printing out the x-present element until after
       the x-stage's text is clicked. Below is an example.
   </x-speaker>
   <x-stage delay="click">Content waiting to be revealed.</x-stage>
   <x-speaker name="main-character">
   FRISE also supports transition animations that are shown when you
   click a link or that are shown when you first enter a location.
   </x-speaker>
   <p><a data-transition="slide-out-right" data-duration="1000"
       href="#example-effects">Let's transition to some more example text
       effects</a>.</p>
   </x-present>
</x-location>
<x-location id="example-effects"
   style="background:#000
       url('images/a_cartoon_skyline_at_night_easy_diffusion.webp')
       no-repeat left top; background-size: 100% 100%;
       left:0;right:0;padding:20px;color:gold;">
   <x-present>
       <h1>Example Effects</h1>
       <p><x-pulse class='repeating'>This text pulses.</x-pulse> By
           default the x-pulse tag only repeats once. Using the repeating
           class, it can be made to pulse forever.</p>
       <p><x-blur>Blurred Texted</x-blur> shows what it looks like for someone
           who needs glasses. Text with weak glasses might be
           <x-mild-blur>mildly blurry</x-mild-blur>. If you have really bad
           eyesight text might have a <x-heavy-blur>heavy blur</x-heavy-blur>.
           If you hover over or hold down your finger on some text, it might
           become <x-unblurable>unblurable</x-unblurable>.
       </p>
       <p><x-blink>Blinking text</x-blink> was very popular on the internet
       in the 1990s.</p>
       <p><x-mirror>Mirrored text</x-mirror>  helps
       people who are reading your game in a sideview mirror and bats really
       like <x-upside-down>upside-down text</x-upside-down>. Text
       can also be
       <x-vertical-mirror>mirrored vertically</x-vertical-mirror></p>
       <p>Here are some random other text effects:</p>
       <div style="width:360px;height:360px; background-color:#66C">
       <ul>
       <li><x-outline>Outlined Text</x-outline></li>
       <li><x-emboss>Embossed Text</x-emboss></li>
       <li><x-condense>Condensed Text</x-condense></li>
       <li><x-expand>Expanded Text</x-expand></li>
       <li><x-rumble>Rumbling Text</x-rumble></li>
       <li><x-shudder>Shuddering Text</x-shudder></li>
       </ul>
       </div>
       <p>Finally, this location shows that <i>style</i> and <i>class</i>
       attributes placed on <i>x-location</i> tags affect how that location
       will be rendered. For this example, we use it to set a background
       image for this page. Be aware when debugging that if you use this,
       you will have to clear site data to see affects if you decide to change
       values for these attributes.</p>
       <img id="frise-guy" src="images/frise_guy_alpha.webp" class="none"
           style="position:fixed; top:30%; width:3in;height:3in;"
           alt="Frise Guy"/>
       <p><a style="color:#DDF" href="javascript:toggleDisplay('frise-guy')"
           >Toggle Frise Guy Display</a>.</p>
       <p><a style="color:#DDF" href="#start"
           >Go back to start of the game</a>.</p>
   </x-present>
</x-location>
</x-game>
<script src="frise/js/game.js" ></script>
<!--You could link additional Javascript code here-->
</body>
</html>
Before either location in our code, we set up the main-character object and its icon. This allows us to use an x-speaker tag with it. The first of the two locations, the one with id="start" in the code above, illustrates the x-stage element. This tag can be used to type out text with a delay. It can also be used in much the same way as the stage attribute of an x-present element: to delay the presentation of more text either with a pause of a certain number of milliseconds or by waiting until a link is clicked. The first usage of x-stage in the start location, the instance that does not have any attributes, shows its use to print out its text contents character-by-character. By default there is a 50ms delay between each letter printed. The tag's delay attribute can be used to set how many milliseconds between characters. If there are no characters between the open and close x-stage tags, then the delay controls how many milliseconds before any text after the x-stage is displayed. This is shown in the second usage of x-stage above. If one has delay="click", then the contents of the x-stage become a link that must be clicked before subsequent text will appear. This is illustrated by the last x-stage element in the above example.
The bottom of the start location has a link to an example-effects location. This link illustrate how to use a transition when one goes from one location to another. Notice the anchor element, the a tag, has attributes:
data-transition="slide-out-right" data-duration="1000"
the first controls the kind of transition from the current location and the second controls how long the transition should take. slide-out-right says translate/slide the current screen's contents rightwards until they disappear from the screen. Other possibilities are: slide-out-left, slide-out-top, slide-out-bottom, fade-out, and scale-out. These are common transitions might be used when exiting a page. For each of them, there is a corresponding transition which may be used for entering a page, for example, fade-in rather fade-out. The in-transitions can either be specified as a class name in a class attribute of a location for when it is entered, or by using an 'x-transition-name' element (for example, x-fade-in) in an x-present tag for a transition within a location.
The example-effects location in our game mainly consists of examples of inline text-effects available in FRISE. The location itself has the style attribute:
style="background:#000
       url('images/a_cartoon_skyline_at_night_easy_diffusion.webp')
       no-repeat left top; background-size: 100% 100%;
       left:0;right:0;padding:20px;color:gold;"
This shows that whole location's can be given style properties (and can be given class properties). In this case, we set a background image to be used behind the whole game screen.
The particular text effect elements illustrated in the example-effects location are: x-pulse, for pulsing text; x-blur, for blurred text; x-mild-blur and x-heavy-blur, two variations on x-blur; x-unblurable, text which becomes unblurred when touched down upon; x-blink, for blinking text; x-mirror, x-vertical-mirror, and x-upside-down, for various reflections and rotations of text; x-outline, x-emboss, which draw various outline for text letters; x-condense, x-expand, which narrow or expand the distance between letters; and x-rumble, x-shudder which shake the text either vertically or horizontally.
After these text effects, the example-effects location concludes with two links: the first is a Javascript link which calls the FRISE function toggleDisplay to toggle the img element with id'' frise-guy from diplay:none to display:block, making it appear or disappear. The point of this link is to illustrate that we can have a location with an image background which as the scene progresses then has additional images superimposed on it. The image used, images/frise_guy_alpha.webp, makes use of an alpha-channel for its background so we only see the Frise Guy character, not a complete 3 inch by 3 inch square. To set the alpha channel, the Instant Alpha tool available in the Preview app on MacOS was used. The last link on this location just links back to the start location. This completes our description of the text effects'' game.
Doll and DollHouse Objects
In Graphics in Interactive Fiction, we describe how paper dolls in games are frequently used to allow a player to control how an object in a game is equipped. In this section, we look at how to code a game with a paper doll in FRISE.
FRISE has two main elements related to paper dolls: x-doll, which describes a particular doll; and x-dollhouse, which describes how a doll should be drawn within a particular x-present element. A doll is a rectangular shape with a width and height. It can also have an icon, an mainimage representing the doll, or a color which should be used to completely fill this shape when drawn. On a doll, one can have zero or more slots. A slot has a base (x,y) coordinate in the doll as well as its own width and height. As with a doll, a slot also can have a icon or color which is used when it is drawn. The figure below shows the basic geometry of a doll.
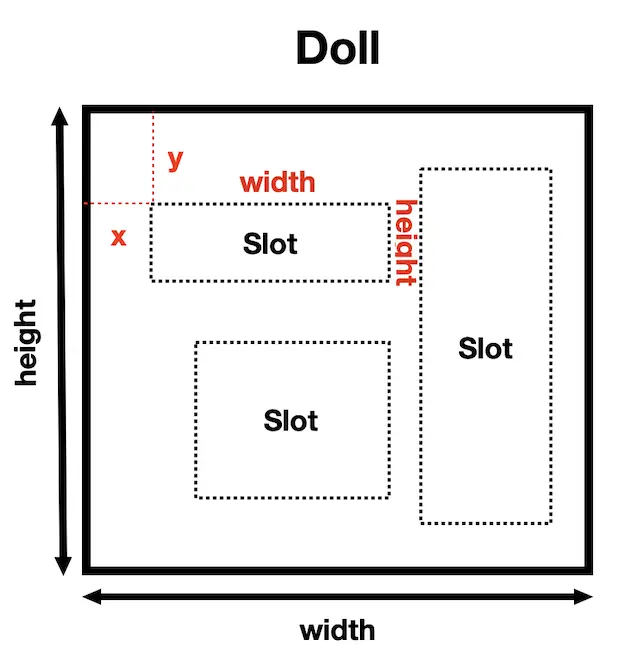
Dolls can be defined once and used in multiple dollhouses. A dollhouse specifies the geometry used to draw a doll within a given x-present element. It specifies which dollhouse id to draw, the width and height of the canvas to draw into, and a rectangle within the doll to actually draw into this canvas. Below is a screenshot of an example game that makes use of a doll and a dollhouse.
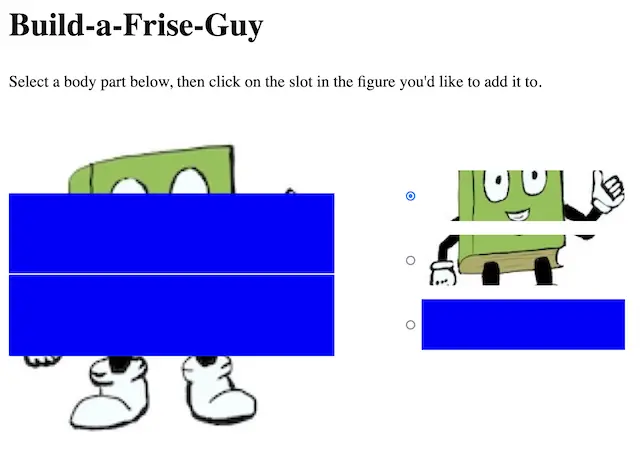
It is Example 12 in the FRISE Download. The idea is you can fill in the missing body parts of Frise Guy by selecting a body part on the right, then clicking on the slot in the Frise doll on the left to put the selected body part there. Code for this game is below:
<!doctype html>
<html lang="en">
<head>
   <title>A FRISE Game with a Dollhouse</title>
   <meta charset="UTF-8" >
   <link rel="stylesheet" href="frise/css/game.css" >
   <!--You could link your own/other stylesheets here-->
   <style>
   .body-parts
   {
       margin-top: 100px;
   }
   .body-part
   {
       padding: 10px;
   }
   .body-part img,
   .body-part span
   {
       background-color:blue;
       color:blue;
       display: inline-block;
       height: 75px;
       vertical-align: middle;
       width: 300px;
   }
   .mobile .body-part
   {
       clear: both;
   }
   </style>
</head>
<body>
<x-game>
<x-object id="main-character">
  <x-position>start</x-position>
  <x-name>Frise Guy</x-name>
  <x-icon>images/frise_guy.webp</x-icon>
</x-object>
<x-doll id="frise-doll">
   <x-icon>images/frise_guy_doll.webp</x-icon>
   <x-width>800</x-width>
   <x-height>800</x-height>
   <x-slots>
       <x-slot>
           <x-color>blue</x-color>
           <x-x>0</x-x>
           <x-y>200</x-y>
           <x-width>800</x-width>
           <x-height>198</x-height>
           <x-click-listener>
           updateSlot(0);
           </x-click-listener>
       </x-slot>
       <x-slot>
           <x-color>blue</x-color>
           <x-x>0</x-x>
           <x-y>402</x-y>
           <x-width>800</x-width>
           <x-height>198</x-height>
           <x-click-listener>
           updateSlot(1);
           </x-click-listener>
       </x-slot>
   </x-slots>
</x-doll>
<x-location id="start">
   <x-present>
   <h1>Build-a-Frise-Guy</h1>
   <p>Select a body part below, then click
   on the slot in the figure you'd like to add it to.</p>
   <x-dollhouse class="float-same" style="margin-right:100px;">
       <x-doll-id>frise-doll</x-doll-id>
       <x-width>480</x-width>
       <x-height>480</x-height>
   </x-dollhouse>
   <div class="body-parts">
   <div class="body-part"><input type="radio" id="frise-face"
       data-for="start" name="body-part" value="images/frise_face.webp">
   <label for="frise-face"><img src="images/frise_face.webp"
       alt="The Face Portion of Frise Guy"></label></div>
   <div class="body-part"><input type="radio" id="frise-waist"
       data-for="start" name="body-part" value="images/frise_waist.webp">
   <label for="frise-waist"><img src="images/frise_waist.webp"
       alt="The Waist Portion of Frise Guy"></label></div>
   <div class="body-part"><input type="radio" id="frise-blank"
       data-for="start" name="body-part" value="">
       <label for="frise-blank"><span>Clear</span></label></div>
   </div>
   </x-present>
</x-location>
</x-game>
<script src="frise/js/game.js" ></script>
<script>
function updateSlot(slot_index)
{
   let doll_obj = doll('frise-doll');
   let body_part = loc('start')['body-part'];
   if (!body_part) {
       body_part = "";
   }
   let doll_slot = doll_obj.slots.get(slot_index);
   doll_slot.icon = body_part;
   doll_obj.init();
}
</script>
<!--You could link additional Javascript code here-->
</body>
</html>
If we look at the code, we notice in the head of document we have some CSS, which is mainly used to specify the size and placement of the div tag and its constituents used to display the possible body parts that we can place on the doll. Then in the body of the document, we define a single x-object for main-character so we can define the starting location to be used in the game.
The game's only doll is then defined. It has id frise-doll and is of size 800 x 800 with a background image given by the icon images/frise_guy_doll.webp. This doll has two slots: The first has as its (x,y), top left basepoint, (0, 200) and has dimensions 800 x 198. Initially, it does not use an image but is instead filled in using the color blue (this is what the x-color tag specifies). Similarly, the second slot has basepoint (0, 402) and has dimensions 800 x 198 and is initially colored blue. Each slot has an x-click-listener element which is used to specify Javascript to be executed if that slot is clicked. The first slot's listener calls updateSlot(0), the second slot's listener calls updateSlot(1).
After the definition of the doll, the location with id start is defined. This is the only location in the game. Its x-present tag first outputs a header title, some instructions, and then has a dollhouse. This dollhouse specifies in its x-doll-id element the doll to be drawn, frise-doll. It also specifies that the canvas to use for drawing should have width and height 480 x 480. Thus, when this 800 x 800 doll is drawn, it will be scaled down to 480 x 480. By default, since we don't tell FRISE otherwise, the whole doll will be drawn. We will see in the next section an example dollhouse that only draws part of a doll.
After the dollhouse, the start location has a div element with id body-parts. It contains three radio button form controls, each of which is followed by an image of a body part (or of a filled in div tag blue rectangle, which is supposed to be used to remove body parts). The data-for and name attributes say that the value associated with the currently selected button should be stored in the location start's body-part property.
Finally, to conclude our description of this game, the updateSlot function is specified in a script tag after the x-game tag. It uses the value of loc('start')['body-part'] to set the icon for the slot number sent in its argument. It then calls the slot's init method to ensure that the image associated with that icon is loaded so that the doll may be redrawn after the click has been handled.
2D Choice-Based RPGs in FRISE
In Graphics in Interactive Fiction, we said one common category of interactive story is an RPGs where the player moves directionally on a map, say using arrow or W, A, S, D keys, and can bump into objects at which point text is displayed and choices may be given. In this section, we consider how such a game might be implemented using more advanced properties of dolls and dollhouses. Below is a screenshot of the game we will develop. In it, the user can move through a dungeon using the arrow keys. The goal of the game is to unlock a treasure chest. This can be achieved by interacting with various objects in the world.
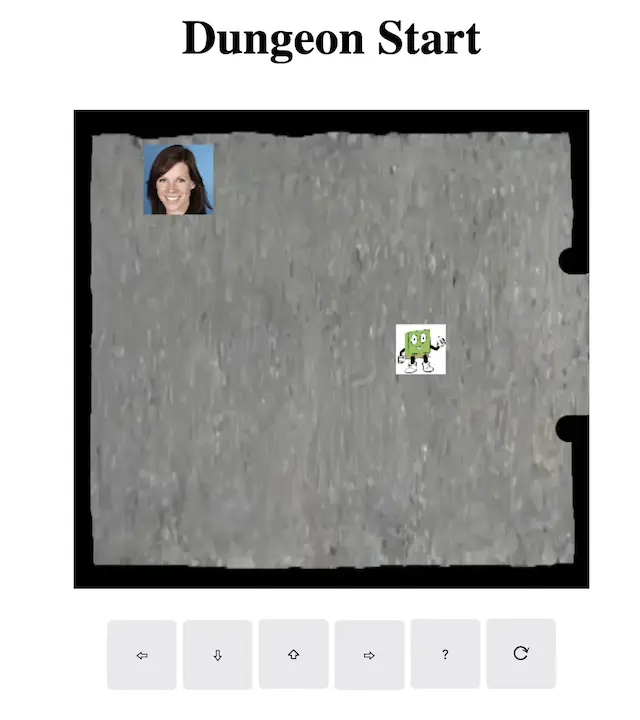
This game is Example 13 in the FRISE Download. To understand how it works let's look at its source:
<!doctype html>
<html lang="en">
<head>
   <title>A 2D Choice-Based RPG</title>
   <meta charset="UTF-8" >
   <link rel="stylesheet" href="frise/css/game.css" >
   <!--You could link your own/other stylesheets here-->
   <style>
   h1
   {
       text-align: center;
   }
   .information
   {
       background-color: #FFC;
       border: 10px solid gray;
       height:100%;
       left: 0;
       margin: auto;
       overflow-y: scroll;
       padding: 20px;
       position:fixed;
       top: 0;
       width: calc(100% - 60px);
   }
   button.small-width
   {
       min-height: 0.5in;
   }
   .arrow-controls
   {
       margin: auto;
       text-align: center;
       width:517px;
   }
   .arrow-controls x-button
   {
       font-weight: normal;
       font-size: 14pt;
       margin: 0;
       padding: 0px;
       vertical-align: middle;
   }
   .mobile .arrow-controls x-button
   {
       position: relative;
       top: 1px;
   }
   .arrow-controls x-button span
   {
       position: relative;
       top: 20px;
   }
   .mobile .arrow-controls x-button span
   {
       top: 5px;
   }
   .arrow-controls x-button,
   .arrow-controls button
   {
       background-color: #E9E9EB;
       border: none;
       border-radius: 5px;
       color: black;
       height: 70px;
       width: 70px;
   }
   .mobile .arrow-controls
   {
       width: 300px;
   }
   .mobile .arrow-controls x-button,
   .mobile .arrow-controls button
   {
       height: 40px;
       width: 40px;
   }
   #game-content canvas
   {
       margin: 30px auto 30px auto;
   }
   .mobile #game-content canvas
   {
       margin: 15px auto 15px auto;
   }
   *
   {
       touch-action: manipulation;
       -webkit-touch-callout: none;
       -webkit-user-select: none;
       user-select: none;
   }
</style>
</head>
<body>
<x-game>
<x-object id="main-character">
   <x-position>start</x-position>
   <x-name>Frise Guy</x-name>
   <x-icon>images/frise_guy.webp</x-icon>
   <x-controls>
   <div class="arrow-controls">
   <button onclick="keydownCanvas('a');" >⇦</button>
   <button onclick="keydownCanvas('s');">⇩</button>
   <button onclick="keydownCanvas('w');">⇧</button>
   <button onclick="keydownCanvas('d');">⇨</button>
   <button onclick="toggleDisplay('help');elt('help').focus();"
       >?</button>
   <x-button href="#reset;start">⟳</x-button>
   </div>
   <div id="help" class="none information">
   <h1>Game Controls Help</h1>
   <p>Use the arrow buttons to navigate. The ⟳ button resets the game.</p>
   <p>If the game canvas is in focus (say by clicking it, if not working)
   then the arrow keys and W (UP), A (LEFT,) S (DOWN), D (RIGHT) can also
   be used to navigate.</p>
   <p><a href="javascript:toggleDisplay('help');
       sel('#game-content canvas')[0].focus()">Back to Game...</a></p>
   </div>
   <x-controls>
</x-object>
<x-object id="sarah">
   <x-position>start</x-position>
   <x-name>Sarah</x-name>
   <x-icon>images/sarah.webp</x-icon>
</x-object>
<x-doll id="left-room">
   <x-icon>images/room_a.webp</x-icon>
   <x-width>517</x-width>
   <x-height>480</x-height>
   <x-slots>
       <x-slot>
           <x-id>exit</x-id>
           <x-icon>images/exit_a.webp</x-icon>
           <x-x>482</x-x>
           <x-y>135</x-y>
           <x-width>35</x-width><x-height>200</x-height>
           <x-collision-listener>
               uncollide(event, this);
               game.takeTurn("#passageway");
           </x-collision-listener>
       </x-slot>
       <x-slot>
           <x-id>sarah</x-id>
           <x-icon>images/sarah.webp</x-icon>
           <x-x>70</x-x>
           <x-y>35</x-y>
           <x-width>70</x-width>
           <x-height>70</x-height>
           <x-collision-listener>
               uncollide(event, this);
               toggleDisplay('sarah-quest');
               elt('sarah-quest').focus();
           </x-collision-listener>
       </x-slot>
   </x-slots>
</x-doll>
<x-doll id="corridor">
   <x-icon>images/corridor.webp</x-icon>
   <x-width>1280</x-width>
   <x-height>480</x-height>
   <x-slots>
       <x-slot>
           <x-id>key</x-id>
           <x-icon>images/key.webp</x-icon>
           <x-x>700</x-x>
           <x-y>350</x-y>
           <x-width>100</x-width>
           <x-height>100</x-height>
           <x-collision-listener>
               uncollide(event, this);
               toggleDisplay('pick-up-key');
               elt('pick-up-key').focus();
           </x-collision-listener>
       </x-slot>
       <x-slot>
           <x-id>exit-left</x-id>
           <x-icon>images/exit_b.webp</x-icon>
           <x-x>0</x-x>
           <x-y>135</x-y>
           <x-width>35</x-width>
           <x-height>200</x-height>
           <x-collision-listener>
               uncollide(event, this)
               game.takeTurn("#start");
           </x-collision-listener>
       </x-slot>
       <x-slot>
           <x-id>exit-right</x-id>
           <x-icon>images/exit_a.webp</x-icon>
           <x-x>1250</x-x>
           <x-y>135</x-y>
           <x-width>35</x-width><x-height>200</x-height>
           <x-collision-listener>
               uncollide(event, this)
               game.takeTurn("#treasure-room");
           </x-collision-listener>
       </x-slot>
   </x-slots>
</x-doll>
<x-doll id="right-room">
   <x-icon>images/room_b.webp</x-icon>
   <x-width>517</x-width>
   <x-height>480</x-height>
   <x-slots>
       <x-slot>
           <x-id>exit</x-id>
           <x-icon>images/exit_b.webp</x-icon>
           <x-x>0</x-x>
           <x-y>140</x-y>
           <x-width>35</x-width>
           <x-height>200</x-height>
           <x-collision-listener>
               uncollide(event, this)
               game.takeTurn("#passageway");
           </x-collision-listener>
       </x-slot>
       <x-slot>
           <x-id>treasure</x-id>
           <x-icon>images/old-chest.webp</x-icon>
           <x-x>430</x-x>
           <x-y>340</x-y>
           <x-width>50</x-width>
           <x-height>50</x-height>
           <script type="text/collision-listener">
               uncollide(event, this);
               if (mc().has_key) {
                   toggleDisplay('you-win');
                   elt('you-win').focus();
               } else {
                   toggleDisplay('locked-treasure');
                   elt('locked-treasure').focus();
               }
           </script>
       </x-slot>
   </x-slots>
</x-doll>
<x-location id="start">
   <x-present>
   <h1>Dungeon Start</h1>
   <x-dollhouse>
       <x-doll-id>left-room</x-doll-id>
       <x-width>517</x-width>
       <x-height>480</x-height>
       <x-navigable>true</x-navigable>
       <x-player-x>260</x-player-x>
       <x-player-y>240</x-player-y>
       <x-player-width>50</x-player-width>
       <x-player-height>50</x-player-height>
       <x-player-step>10</x-player-step>
       <x-padding-top>30</x-padding-top>
       <x-padding-bottom>30</x-padding-bottom>
       <x-padding-left>25</x-padding-left>
       <x-padding-right>25</x-padding-right>
   </x-dollhouse>
   ${mc().controls}
   <div id="sarah-quest" class="none information" tabindex="0">
   <x-speaker name="sarah">
       Greetings! Your quest is to get the treasure hidden in this
       dungeon!
   </x-speaker>
   <a href="javascript:toggleDisplay('sarah-quest');
       sel('#game-content canvas')[0].focus()">Continue...</a>
   </div>
   </x-present>
   <script type="text/default-action">
   if (isHere()) {
       let player_slot = doll('left-room').getPlayerSlot();
       if (player_slot !== false && mc().old_position == 'corridor') {
           player_slot.x = 400;
           player_slot.y = 190;
           player_slot.width = 50;
           player_slot.height = 50;
       }
   }
   </script>
</x-location>
<x-location id="passageway">
   <x-present>
       <h1>A Long Corridor</h1>
       <div class="corridor-top"></div>
       <x-dollhouse>
           <x-doll-id>corridor</x-doll-id>
           <x-width>640</x-width>
           <x-height>240</x-height>
           <x-navigable>true</x-navigable>
           <x-scrollable>true</x-scrollable>
           <x-player-width>100</x-player-width>
           <x-player-height>100</x-player-height>
           <x-player-step>10</x-player-step>
           <x-padding-top>30</x-padding-top>
           <x-padding-bottom>30</x-padding-bottom>
           <x-padding-left>25</x-padding-left>
           <x-padding-right>25</x-padding-right>
       </x-dollhouse>
       <div class="corridor-bottom"></div>
       ${mc().controls}
       <div id="pick-up-key" class="none information" tabindex="0">
           <h2>You've picked up a key!</h2>
           <p><a href="javascript:getTreasureKey()">Continue...</a></p>
       </div>
   </x-present>
   <script type="text/default-action">
   if (isHere()) {
       let corridor = doll('corridor');
       let player_slot = corridor.getPlayerSlot();
       if (player_slot !== false) {
           if (mc().old_position == 'start') {
               player_slot.x = 36;
               player_slot.y = 190;
               corridor['source-x'] = 0;
               corridor['source-y'] = 0;
           } else if (mc().old_position == 'treasure-room') {
               player_slot.x = 1100;
               player_slot.y = 190;
               corridor['source-x'] = 200;
               corridor['source-y'] = 0;
               corridor['source-width'] = 1280;
               corridor['source-height'] = 480;
           }
           player_slot.width = 100;
           player_slot.height = 100;
       }
   }
   </script>
</x-location>
<x-location id="treasure-room">
   <x-present>
   <h1>Treasure Room</h1>
   <x-dollhouse>
       <x-doll-id>right-room</x-doll-id>
       <x-width>517</x-width>
       <x-height>480</x-height>
       <x-navigable>true</x-navigable>
       <x-player-step>10</x-player-step>
       <x-padding-top>30</x-padding-top>
       <x-padding-bottom>30</x-padding-bottom>
       <x-padding-left>25</x-padding-left>
       <x-padding-right>25</x-padding-right>
   </x-dollhouse>
   ${mc().controls}
   <div id="locked-treasure" class="none information" tabindex="0">
       <h2>The treasure chest is locked! If only there were some way
       to open it...</h2>
       <p><a href="javascript:toggleDisplay('locked-treasure');
       sel('#game-content canvas')[0].focus()">Continue...</a></p>
   </div>
   <div id="you-win" class="none information" tabindex="0">
       <h2>Congratulations! You got the treasure! You win!</h2>
       <p><a href="#reset;start">Play again...</a></p>
   </div>
   </x-present>
   <x-action id="reset">
       game.reset();
   </x-action>
   <script type="text/default-action">
   if (isHere()) {
       let player_slot = doll('right-room').getPlayerSlot();
       if (player_slot !== false && mc().old_position == 'passageway') {
           player_slot.x = 50;
           player_slot.y = 190;
           player_slot.width = 50;
           player_slot.height = 50;
       }
   }
   </script>
</x-location>
</x-game>
<script src="frise/js/game.js" ></script>
<script>
function keydownCanvas(key)
{
   let canvas = sel('#game-content canvas')[0];
   canvas.dispatchEvent(new KeyboardEvent('keydown',
       {'code': "Key" + key.toUpperCase()}));
}
function getTreasureKey()
{
   toggleDisplay('pick-up-key');
   mc().has_key = true;
   let doll_obj = doll('corridor');
   doll_obj.slots.removeById("key");
   doll_obj.redraw = true;
   sel('#game-content canvas')[0].focus()
}
function uncollide(event, doll_slot)
{
   let other = (event.a.id != doll_slot.id) ? event.b : event.a;
   let dollhouse = event.dollhouse;
   dollhouse['source-x'] = other.old_source_x;
   dollhouse['source-y'] = other.old_source_y;
   dollhouse.source_width = other.old_source_width;
   dollhouse.source_height = other.old_source_height;
   dollhouse.player_slot.x = other.old_x;
   dollhouse.player_slot.y = other.old_y;
   other.x = other.old_x;
   other.y = other.old_y;
}
</script>
</body>
</html>
Examining the code, one can see it has three locations. Their id's are: start, passageway, and treasure-room. Each location has a single x-present element and this single presentation draws a single dollhouse. start's dollhouse has on it a doll with id left-room, passageway's dollhouse has on it a doll with id corridor, and finally, treasure-room's dollhouse has on it a doll with id right-room.
Notice each location's dollhouse now has an x-navigable element whose contents are the string true. This tells FRISE to add to the doll in the dollhouse an additional player slot. This slot will have as its image, the main-character's icon. FRISE will also set up the necessary listeners on the W, A, S, D and arrow keys so that this slot can move around within the doll, and so that the doll will be periodically redrawn. How many pixels that a player moves per single key press is controlled by the contents of the dollhouse's x-player-step element. For finer control, one could use two elements: x-player-step-x and x-player-step-y to set the movement speed spearately in each axis. In our case, x-player-step sets a move rate of 10 pixels/key press.
By default, the player slot will be restricted by FRISE so that it stays within the boundaries of its doll. If we look at the main icon of each doll, they each have a hand-drawn (some may say, poorly drawn) wall. To tell FRISE the player should be restricted to a certain distance away from a boundary of the doll, each dollhouse can have x-padding-top, x-padding-bottom, x-padding-left, and x-padding-right values to specify a closest distance in pixels from a given side of the doll that a player slot is allowed to get. Notice the passageway's dollhouse has a x-scrollable element which also has content true. This tells FRISE that if the doll's dimensions are too big, only show a portion of the doll on the dollhouse's canvas rather than scaling it to fit. Notice passageway 's dollhouse has dimensions 640 x 240, yet its corridor doll has dimensions 1280 x 480. By default, the view shown in the dollhouse is centered on the player slot, and the player slot is positioned to start at the center of its doll. We'll see in a minute that this positioning can be controlled using Javascript. This means, though, that what is drawn in the dollhouse will be a 640 x 240 rectangle from the 1280 x 480 doll and it will be centered on the player. Since the width of the doll is twice that of all other dolls, if we left the player icon the same size the icon would appear small on the screen. To counter this, in the passageway's dollhouse, we set the size to draw the player's icon to 100 x 100 by using the x-player-width, x-player-height tags.
Let's look at the two objects (x-object elements) that are defined for this game: the main-character object, and the sarah object. Both of these begin in the start location, so this will be the location that is initially presented at the start of the game. Each has an icon defined, so can be drawn if we have x-speaker tags in x-present elements. Notice the main-character has an x-controls element. This is not a built-in element in FRISE, but as we have seen earlier FRISE will automatically add its contents as a controls property to the main-character object. This means we can output the contents of this property wherever we want in a presentation using the notation ${mc().controls}. We use this idea to code the buttons to move the player once and then output them in each location we use them.
We now go through the code for each location in turn explaining how the locations will be connected to each other. Beginning with the start location, its dollhouse explicitly gives a default starting position for the player using the x-player-x, x-player-y elements. Notice the div element with the x-speaker for sarah on it, has class "none", whose CSS says display: none, so will not initially be displayed. If we look at the left-room of the start location's dollhouse, we see it has two slots: an exit slot and a sarah slot, and each of these has a x-collision-listener element. This element contains Javascript which will be invoked if the player slot collides with the slot with the listener. We could have defined the listener using a <script type='text/collision-listener'> /*some code */</script> if we wanted or if we had code with greater than or less than symbols. In the case of the exit slot, the code of the listener has two statements uncollide(event, this) and game.takeTurn("#passageway"), the latter moves the main-character to the passageway location.
The overall effect of these two lines is that the exit slot will act as a doorway to the passageway location. The uncollide function appears towards the end of the game code:
function uncollide(event, doll_slot)
{
   let other = (event.a.id != doll_slot.id) ? event.b : event.a;
   let dollhouse = event.dollhouse;
   dollhouse['source-x'] = other.old_source_x;
   dollhouse['source-y'] = other.old_source_y;
   dollhouse.source_width = other.old_source_width;
   dollhouse.source_height = other.old_source_height;
   dollhouse.player_slot.x = other.old_x;
   dollhouse.player_slot.y = other.old_y;
   other.x = other.old_x;
   other.y = other.old_y;
}
It takes two arguments: the collision event and the doll_slot that triggered the event. The event variable in the x-collision-listener of the exit slot is automatically set up with information about the collision. A collision event has three properties a and b, corresponding to the two slot objects involved in the collision; and dollhouse, which corresponds to the dollhouse where the main-character was when the collision occurred. Whenever a player slot moves, FRISE keeps track of the previous position information in a sequence of old_ properties of the dollhouse and the player slot. The source-x, source-y quantities are used to track the player slot position within the dollhouse, the x, y player slot information track the player within its doll. To undo the move that caused the collision, the uncollide code switches all of these back to their previous values.
The collision listener for the sarah slot of the start location looks like:
uncollide(event, this);
toggleDisplay('sarah-quest');
elt('sarah-quest').focus();
The first line moves the player slot back so that it is not colliding. The second line changes the div tag mentioned above with the sarah x-speaker element, so that it can be seen. If we look at the definition of the CSS class information, we see that this div will take up the whole screen and will be on top of dollhouse. The last line set's the focus of keyboard, touch, etc., input to this div element. This div element displays text with the quest for the player (to get the treasure in the treaure chest) and it will be displayed when the player collides with (talks to) the sarah icon (slot) on the start location.
Assume the player slot collides with the exit slot, and the main-character is moved to the passageway location. This location has a default action whose code block is enclosed in an if statement:
if (isHere()) {
}
so will only be run if the main-character is at the passageway location. The code in the if statement checks if the main-character has just come from start location or just come from the treasure-room. Depending on this, it sets up the player slot's position in the corridor doll, and the player slot's position and window in passageway's dollhouse (source-x, source-y, source-width, source-height), to either the left or right end of the corridor doll according to the direction the main-character has just come.
The corridor doll on the passageway location's dollhouse has three slots: a key slot, approximately half-way along the corridor on the bottom of the corridor; an exit-left slot, located at the left side of the corridor, and exit-right slot, located at the right side of the corridor. The collision listener's for the exit-left slot and exit-right slot, take the main-character to respectively the start location and treasure-room location, so act as doorways. The key slot's listener toggles a div tag which says that the key has been picked. The continue anchor link on this div when clicked calls a Javascript function getTreasureKey(). This function sets the main-character object's has_key property to true. It also deletes the key slot from the corridor doll and schedules the passageway's dollhouse to be redrawn. It also turns off the display of the key acquired message's div tag.
Assume the main-character leaves the passageway after the player slot collides with the exit-right slot to enter treasure-room location. The treasure-room location has a default action which sets up the player slot's location within the treasure room. The treasure room's dollhouse displays the right-room doll which has two slots on it: an exit slot, whose collision listener and position are set so that it acts as a doorway back to the passageway location; and a treasure slot, whose icon is a treasure chest. The collision listener for the treasure slot checks if the main-character objects has_key property is true or not. If it is true, a div message is revealed which says the player has won the game. The play again link on this div resets the game, so the player can play again. If the has_key property is false, a different div is revealed that tells the player they can't open the chest yet.
This completes the description of this game. It should be noted that the images for the main-character and sarah within the dungeon display as rectangles covering the underlying dungeon background. If we set an alpha channel for these images as described in the Text Effects Built-in to FRISE section, we could show just the character portion of these images. With a little more Javascript, we could also cycle through images as the player slot moves so as to animate the player moving.
Splitting up Larger Games Across Files
When developing a larger scale project, say more than a couple thousand lines of code, it often becomes tedious to find where in a file one would like to edit. For this reason, most larger scale software projects are split over multiple files. Example 14 from the FRISE Download shows how one can split the FRISE game from the FRISE landing page across several files. The code of Example 14 looks like:
<!doctype html>
<html lang="en">
<head>
   <title>An Example Story - Loaded Using <x-include> Tags</title>
   <meta charset="UTF-8" >
   <link rel="stylesheet" href="frise/css/game.css" >
</head>
<body>
<x-game><!-- Tags beginning with x- are valid HTML, FRISE makes use a small
             number of these. The x-game tag goes around the game code. -->
<x-object id="main-character"><!-- Games can have many object's for people,
                               things, etc., but must have a main-character-->
   <x-position>start</x-position><!-- x-position is used to say the location
                                   of an object. The game always presents
                                   the location of the main character.
                                   For other objects, position is optional -->
   <x-name>Frise Guy</x-name><!-- name to use when object speaks -->
   <x-icon>images/frise_guy.webp</x-icon><!-- icon used if an object speaks -->
   <x-smile>Muted</x-smile><!-- Feel free to make up x-tags for other
                                attributes of your objects -->
</x-object>
<x-include>14 include 1.mod</x-include>
<x-include>14 include 2.mod</x-include>
</x-game>
<script src="frise/js/game.js" ></script>
</body>
</html>
Notice the two x-include elements in this example. An x-include element is not displayed by FRISE; however, such an element tells FRISE to fetch the document mentioned in the content of the tag, load it, and insert that document in an tag x-loaded element immediately after the x-include element. So in the above example, FRISE will load and insert two documents 14 include 1.mod and 14 include 2.mod which contain the rest of the game from the landing page. When FRISE processes a game, it first loads all the x-include'd files, then it initializes and starts the game.
Modern browsers take security seriously. As such, FRISE game external files won't be loaded if a game is viewed directly from the filesystem (with a url that begins with file://). A modern browser also won't load files from different server origins than the base file unless Cross-Origin Resource Sharing is properly done. Nevertheless, if you are intending to host your FRISE game all on the same web-site, x-include's will work. Alternatively, you can also split your FRISE game across files during development and run a web server on your development machine to view the game. Any web-server can be used for this purpose such as for example XAMPP, or if you have Nodejs installed, you could type:
npm i http-server -g
then type
http-server path_to_your_game_folder
to serve your game locally. Then, when you are ready to distribute your game for download and you want to assemble all the included files into one file, you can view your game on the local web server, appending ?view-source to the end of the url. To do this, if on your local web server, your game was at:
http://localhost/some_path/your_game
you would use the url
http://localhost/some_path/your_game?view-source
This will show the source code and you can copy and paste it into a file to use for your download.
Slideshows Using FRISE
FRISE can be used for a number of purposes in addition to writing interactive fiction. One can use it as a light-weight tool for prototyping user interfaces (UIs). Out of the box, FRISE-based UIs work on desktop, tablet, and mobile. As FRISE supports basic form elements and mapping them to internal application state, one can imagine using this to develop full-fledged, single web-page applications. One can write a simple app then for either iPhone, Android, or Desktop that just displays the web page of this app to make stand-alone mobile and Desktop applications. In this section, we look at a simpler application of FRISE: as a simple language for writing HTML slideshow presentations.
The image above shows the first slide in Example 15 from the FRISE Download. The slideshow itself goes over the basics of making slides in FRISE. For completeness though, we mention the basic set-up. As with a game, one includes the FRISE CSS file in the head of the a FRISE slideshow, and the FRISE Javascript file toward the bottom of it. Then within the body of the file, slides are contained in an <x-slides>, </x-slides> tag pairs, and an individual slide is contained within <x-slide>, </x-slide> tag pairs. Below is an example slideshow that consists of two slides.
<!doctype html>
<html lang="en">
<head>
    <title>Slides using FRISE</title>
    <meta charset="UTF-8" >
    <link rel="stylesheet" href="frise/css/game.css" >
    <!--Link your own/other stylesheets here-->
</head>
<body>
<x-slides>
    <x-slide>
    <h1>First Slide<h1>
    <ul>
    <li>Point 1</li>
    <li>Point 2</li>
    </ul>
    </x-slide>
    <x-slide>
    <h1>Second Slide<h1>
    <ol>
    <li>Ordered Point 1</li>
    <li>Ordered Point 2</li>
    </ol>
    </x-slide>
</x-slides>
<script src="frise/js/game.js" ></script>
</body>
</html>
One could view such a slideshow, just as one views any FRISE game, by opening it in a browser. The arrow keys or swiping can be used to go forward and backward through the slides. As we can see above, standard HTML can be used within any given slide. Also, any FRISE tags that can appear in a FRISE x-present element also work. Unlike a FRISE game, a slideshow need not specify a main-character and its location. It is assumed the slide show starts at the first slide. It still might be useful to define x-object elements for characters if one wants to use x-speaker tags in one's slideshow. Like locations in games, one can style and have class attributes on individual x-slides and x-slide elements. Each of these elements also supports two new attributes: in-transition and out-transition, which can be used to specify transition effects into or out of a slide, or in the case of the x-slides element, all slides in the presentation. Example 15 gives further details on using FRISE slides.
Coding Strategies and Debugging Hints
In this section, we try to collect some wisdom about developing stories in FRISE and in making sure that they work as intended. Earlier in A First Interactive Story in FRISE, we described a useful basic folder structure to use with FRISE stories. One way to get this structure and an initial starting game is to just download the FRISE example folder, and delete all but one of the examples stories, then rename this story as desired and work from there. For example, if you chose story The Inventory Game, you would have already set up some initial code for both saving games and a simple inventory system.
Sometimes it is useful in a game to have a location which is used to track quantities which might be used each step of the game and whose values need to be updated each turn. If this is the case, one can create a location whose id is global which has properties for these quantities and whose default action specifies how they change.
Within the story HTML file it can be useful to group similar story elements in similar locations to make them easier to find. So one might an organization such as:
start of HTML
 title and other head document content
 start of game
   nav bar for game
   objects of game beginning with main character
   locations in game beginning with global and start locations
   inventory location
   save location
   actions used by more than one location
 end of game
 Javascript to import frise
 Javascripts for functions used by many objects or locations
end of html
Similarly, it can be useful to adopt a convention for the ordering of parts of game objects and locations. For game objects this could be:
start object making sure to have an id attribute
  x-name element
  x-position element
  x-icon element (if has)
  additional object properties
  default action
end object
And for locations:
start location making sure to have an id attribute
  properties that you want to track for the location
  present properties - making sure location has at least one x-present element
                     - making sure HTML you want to draw is in some x-present element
  actions which might be invoked following a link from this and no other location
  default action for this location
end location
Even with this organization, to find an object or location quickly it often makes sense to use your editor's find function and search for id="id-of-object-or-location-looking-for".
When one is creating a object or location, it can speed things up to take an existing object or location and edit it. If one does this, make sure that the first thing one does is change the id of the object or location. One should also adopt the practice that as soon as one types open part of something that has an open and close part to it to immediately type the corresponding close part before filling in the contents. Thus, if you type <x-object id="foo"> you should immediately type </x-object> before filling in the rest of the object. This will avoid issues about improperly closed or nested tags. Invariably, you will at some point still make errors such as having two objects or locations with the same id, or mis-nested, misspelt, or unclosed tags. To catch these errors, you can use the W3C Validator and select Validate by Direct Input and copy and paste your story HTML there. It will output a report of any broken HTML.
Most modern browser's come with a developer tool pane. Below is a picture of how to find this tool pane in Firefox on a Mac. A quick web search will tell you how to find it for other browsers and on other platforms.
The Web Developer tool pane looks something like:
As we can from this image, the developer pane has several available tabs. The image shows the Inspector tab. This particular tab lets you click on HTML code presented in a tree view format and see visually in the browser window what drawn part of the browser window corresponds to it. The left hand side of this tab window shows the cascading style sheet settings currently in effect for the selected element. This tab can be very useful for debugging the visual look of your story.
Right next to the Inspector tab is the Console tab. Any errors in your Javascript as well as any console.log messages will be shown in this tab. This can often help in figuring out why clicking on a link or a button in your story doesn't work. In the Console tab one can also print out the current value of game objects and locations for the current state of the game. For example, suppose you play a couple steps into your game and want to see what are the values of the properties of the main-character. You could open up the Console tab and type:
game.objects['main-character']
The screenshot below shows the kind of output this produces:
For locations, the analogous syntax would be game.locations['location-you-want-info-for']. You can also test calling functions from the console. For example, typing game.debug() will call game's debug() function. This debug function prints to the console all objects that haven't been assigned a position, and all location's that don't have an x-present element.
A common problem when working on a game is to change some piece of code or an image, and then to refresh the story page but not see any change. This can happen because image content is cached or session data (FRISE's memory of the previous game state) is stale and has not refreshed. Most browser's have a key-stroke sequence which will force all elements on a page to be reloaded. For example, for Firefox on a Mac, the sequence is CMD-SHIFT-R. Alternatively, from the Network tab of the Developer Tools one can disable cache and do a reload. To delete old session data that the browser has for your story, you can go to the Storage tab in the developer tools, select Session Storage and the web page of your story and then delete each of the key-values stored under your story's location.
As a final coding and debugging hint, the Developer Pane's Accessibility Tab is useful for doing automated inspections of how easy your game is to use for people of different abilities. For example, on Firefox it has tools to simulate how you game might look to someone who is color blind. This can be very helpful in choosing color schemes for your stories to make sure that they will be visible to as wide a range of user's as possible.